Burn your firmware – onto MDBT50Q-RX that is

Hi there, folks!
So you have hopefully downloaded your IDE, you have written your code which you then plan to copy it over onto your MDBT50Q-RX and make it execute your master plan to take over the world!
Seriously, don’t underestimate the Nordic nRF52840 based MDBT50Q-RX. USB sticks with Bluetooth can do wonders 😉
So, first of all, in order to be able to burn your code onto the USB Dongle, you will have to know the nerdy parts which includes which pins you will have to connect to. In our very well documented specification sheet for MDBT50Q-RX on section 8 which is called “Reference Circuit", you will find parts down to the left that has “3.3V/SWDIO/SWCLK/GND" marks on it:
MDBT50Q-RX Circuit
Further down in the specification sheet, in section 9, you will find pictures illustrating where exactly on the PCB you can find these pins:
Pin locationsNow we know what to look for and where they are, so now we have only got to tell you how to use them.Some people might not know this, but for developing these things, you need to get something called J-Link to connect your MDBT50Q-RX to your desktop. However, since this J-Link, when buying the official one from SEGGER, is very expensive, we strongly recommend you to just buy the nRF52840-DK from Nordic Semiconductor as it can be used as a J-Link through their software development kit (SDK) called nRFgo Studio and is MUCH CHEAPER than the official J-Link from SEGGER is.
Sidenote: There are a couple of other reasons why you should just get your hands on a nRF52840-DK from Nordic Semiconductor instead of getting a SEGGER J-Link, but that’s not the topic of this post ;)When this is done, this is finally how you connect your MDBT50Q-RX to your J-Link to make it all work:

MDBT50Q-RX and J-Link connection

Here you will have to pay attention to the fact that you have to connect J-Link pins 3, 5 & 9 to GND. Otherwise, you won’t be able to burn anything onto your dear MDBT50Q-RX.
The physical connection should look like this:

J-Link Cable Connection

Pay attention to the direction of the cable, because that will also matter. The direction we mean in this case is which way the slim strip of red is facing.

As we have just revised our MDBT50Q-RX, our customers who have been developing firmware for our USB dongle should take a look at our previous blog post in which we explain about the changes made or contact us directly at service@raytac.com

Have a good day and we at Raytac wish you smooth and happy tinkering 🙂

Raytac Corporation 勁達國際電子股份有限公司
A company of Abietec
Bluetooth & WiFi module maker based on Nordic nRF54, nRF53, nRF52, nRF7002 solution
BT5.4 &BT5.3 & BT5.2 & BT5.1 Qualified, FCC/IC/CE/Telec/KC/RCM/SRRC/NCC Pre-Certified. Bluetooth Solution: nRF54, nRF5340, nRF52840, nRF52833, nRF52832, nRF52820, nRF52811, nRF52810, nRF52805, nRF51822 WiFi Solution: nRF7002
www.raytac.com
email:service@raytac.com
Tel: +886.2.3234.0208

Raytac Product Change Notice (PCN) Announcement for nRF52840 Dongle: MDBT50Q-RX

Dear Customers,To enable hardware reset function in Raytac’s nRF52840 dongle (P/N: MDBT50Q-RX), Raytac’s has revised the circuit and issued the PCN accordingly.


Description of the Change:

1. Change circuit design to enable the hardware reset function.
2. Change PCB Imprint
3. Change Label
4. Change Part No.

Here provided the content of the PCN for customer’s reference.

PCN-19031801-1
PCN-19031801-2

Customers who have been developing firmware based on pervious dongle, please contact with service@raytac.com to request the latest sample version for evaluation.
Raytac Corporation 勁達國際電子有限公司
A BT5 & BT 4.2 & BTv4.1 module maker based on Nordic nRF51 & nRF52 solution
(nRF51822 & nRF51422 & nRF52832 & nRF52810 & nRF52840)
www.raytac.com email: cs@raytac.com Tel: +886.2.3234.0208

Raytac Corporation at IT Week Hall 3 & 4 / 11-22

With over 600 exhibitors gathering in Tokyo, Japan from April 10-12, IT Week has become one of the biggest exhibitions within the IoT Technology sector.
Raytac is pleased to be attending this years IT Week and present our full range of module family based on Nordic nRF51822, nRF52832 and nRF52840.

Meanwhile, the latest product, MDBT50Q-RX, a multi protocol nRF52840 dongle will make its second public appearance which powers up the most advanced IoT and Mesh network implementations.

Raytac Corporation 勁達國際電子有限公司
A BT5 & BT 4.2 & BTv4.1 module maker based on Nordic nRF51 & nRF52 solution (nRF51822 & nRF51422 & nRF52832 & nRF52810 & nRF52840)

How To Use nRF52840/nRF52833 module DevKit(MDBT50Q series) – 2024 Update – Applied to nRF5 SDK

Preface:
Here provides an easy introduction of How to set up of nRF52840 & nRF52833 Module Demo board MDBT50Q-DB-40 (for nRF52840) & MDBT50Q-DB-33 (for nRF52833)


MDBT50Q-DB-40  is a Demo Board built by Raytac’s MDBT50Q-1MV2  with Red PCBA deployed nRF52840 SoC with Bluetooth 5 & Thread Combo, with 1MB Flash Memory and 256KB RAM and Chip Antenna.
 
MDBT50Q-DB-33 is a Demo Board built by Raytac’s MDBT50Q-512K with Green PCBA deployed nRF52833 SoC with Bluetooth 5 & Thread Combo, with 512KB Flash Memory and 128KB RAM and Chip Antenna.
 
Both demo boards are Bluetooth BT5.4 qualified and FCC, IC, CE, Telec, KC, SRRC, RCM, NCC, WPC pre-certified.

Table of contents:

1.1 Hardware Set Up

1.2 Software Kits resources & preparations

1.3 Flash the ready firmware into Raytac’s module

1.4 DFU to MDBT50Q-DB-XX through USB interface 


1.1 Hardware Set Up
 
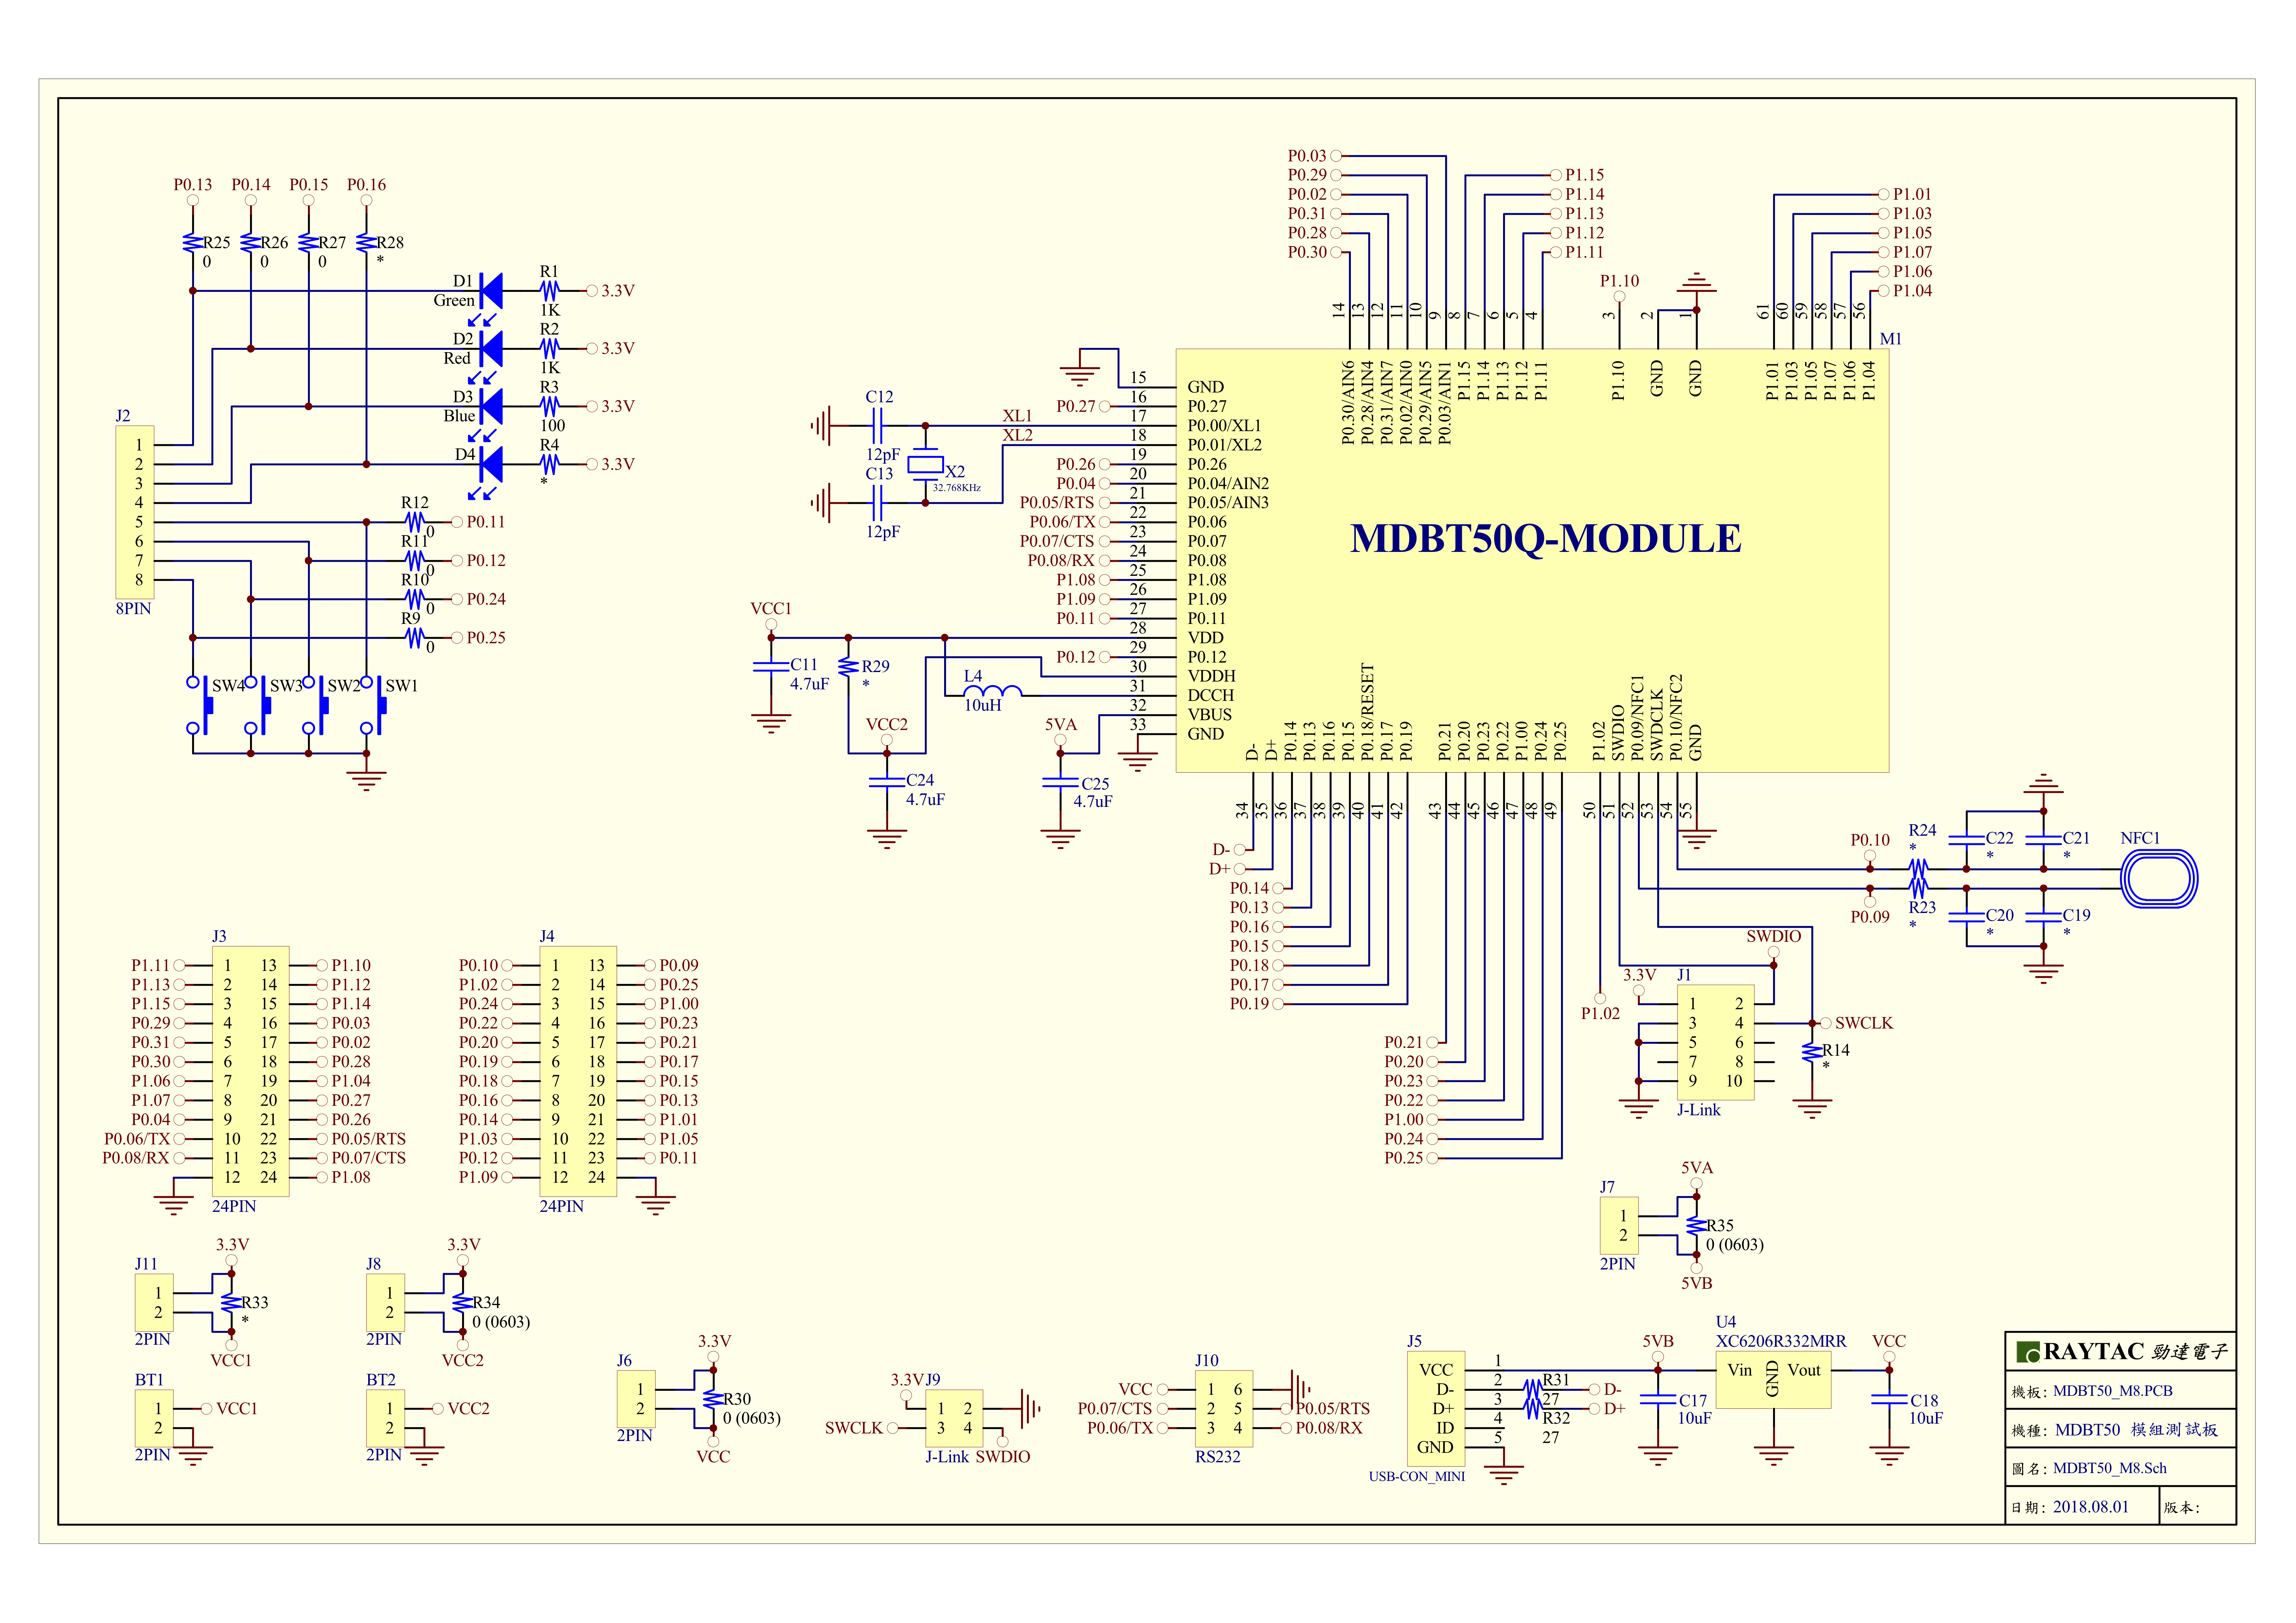
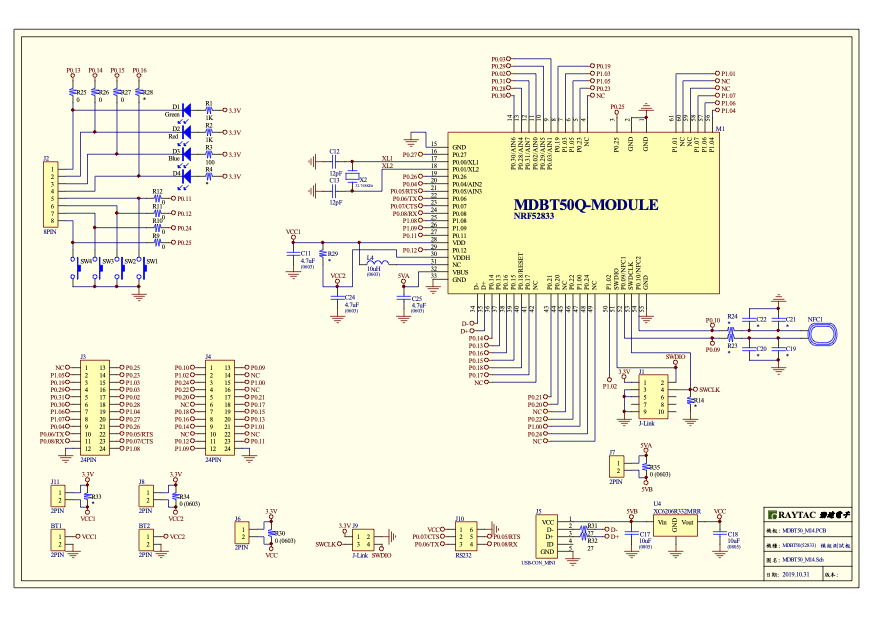
MDBT50Q-DB-XX package contains:
  • 1 x MDBT50Q-DB-40/MDBT50Q-DB-33
  • 1 x IDC Wire
  • 1 x Data/Power Mini USB Wire(for data transferring)

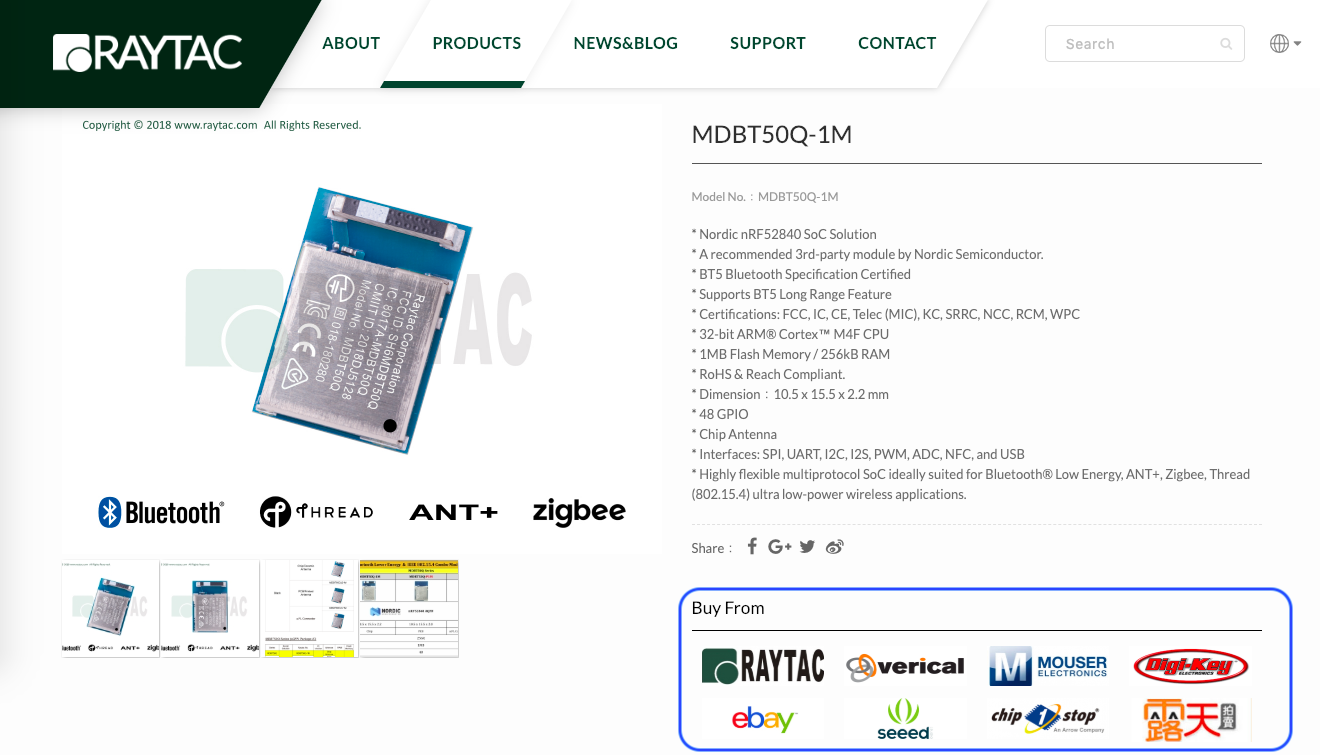
Where to buy MDBT50Q-DB-XX?

MDBT50Q-DB-40 (nRF52840 Solution)

MDBT50Q-DB-33 (nRF52833 Solution)
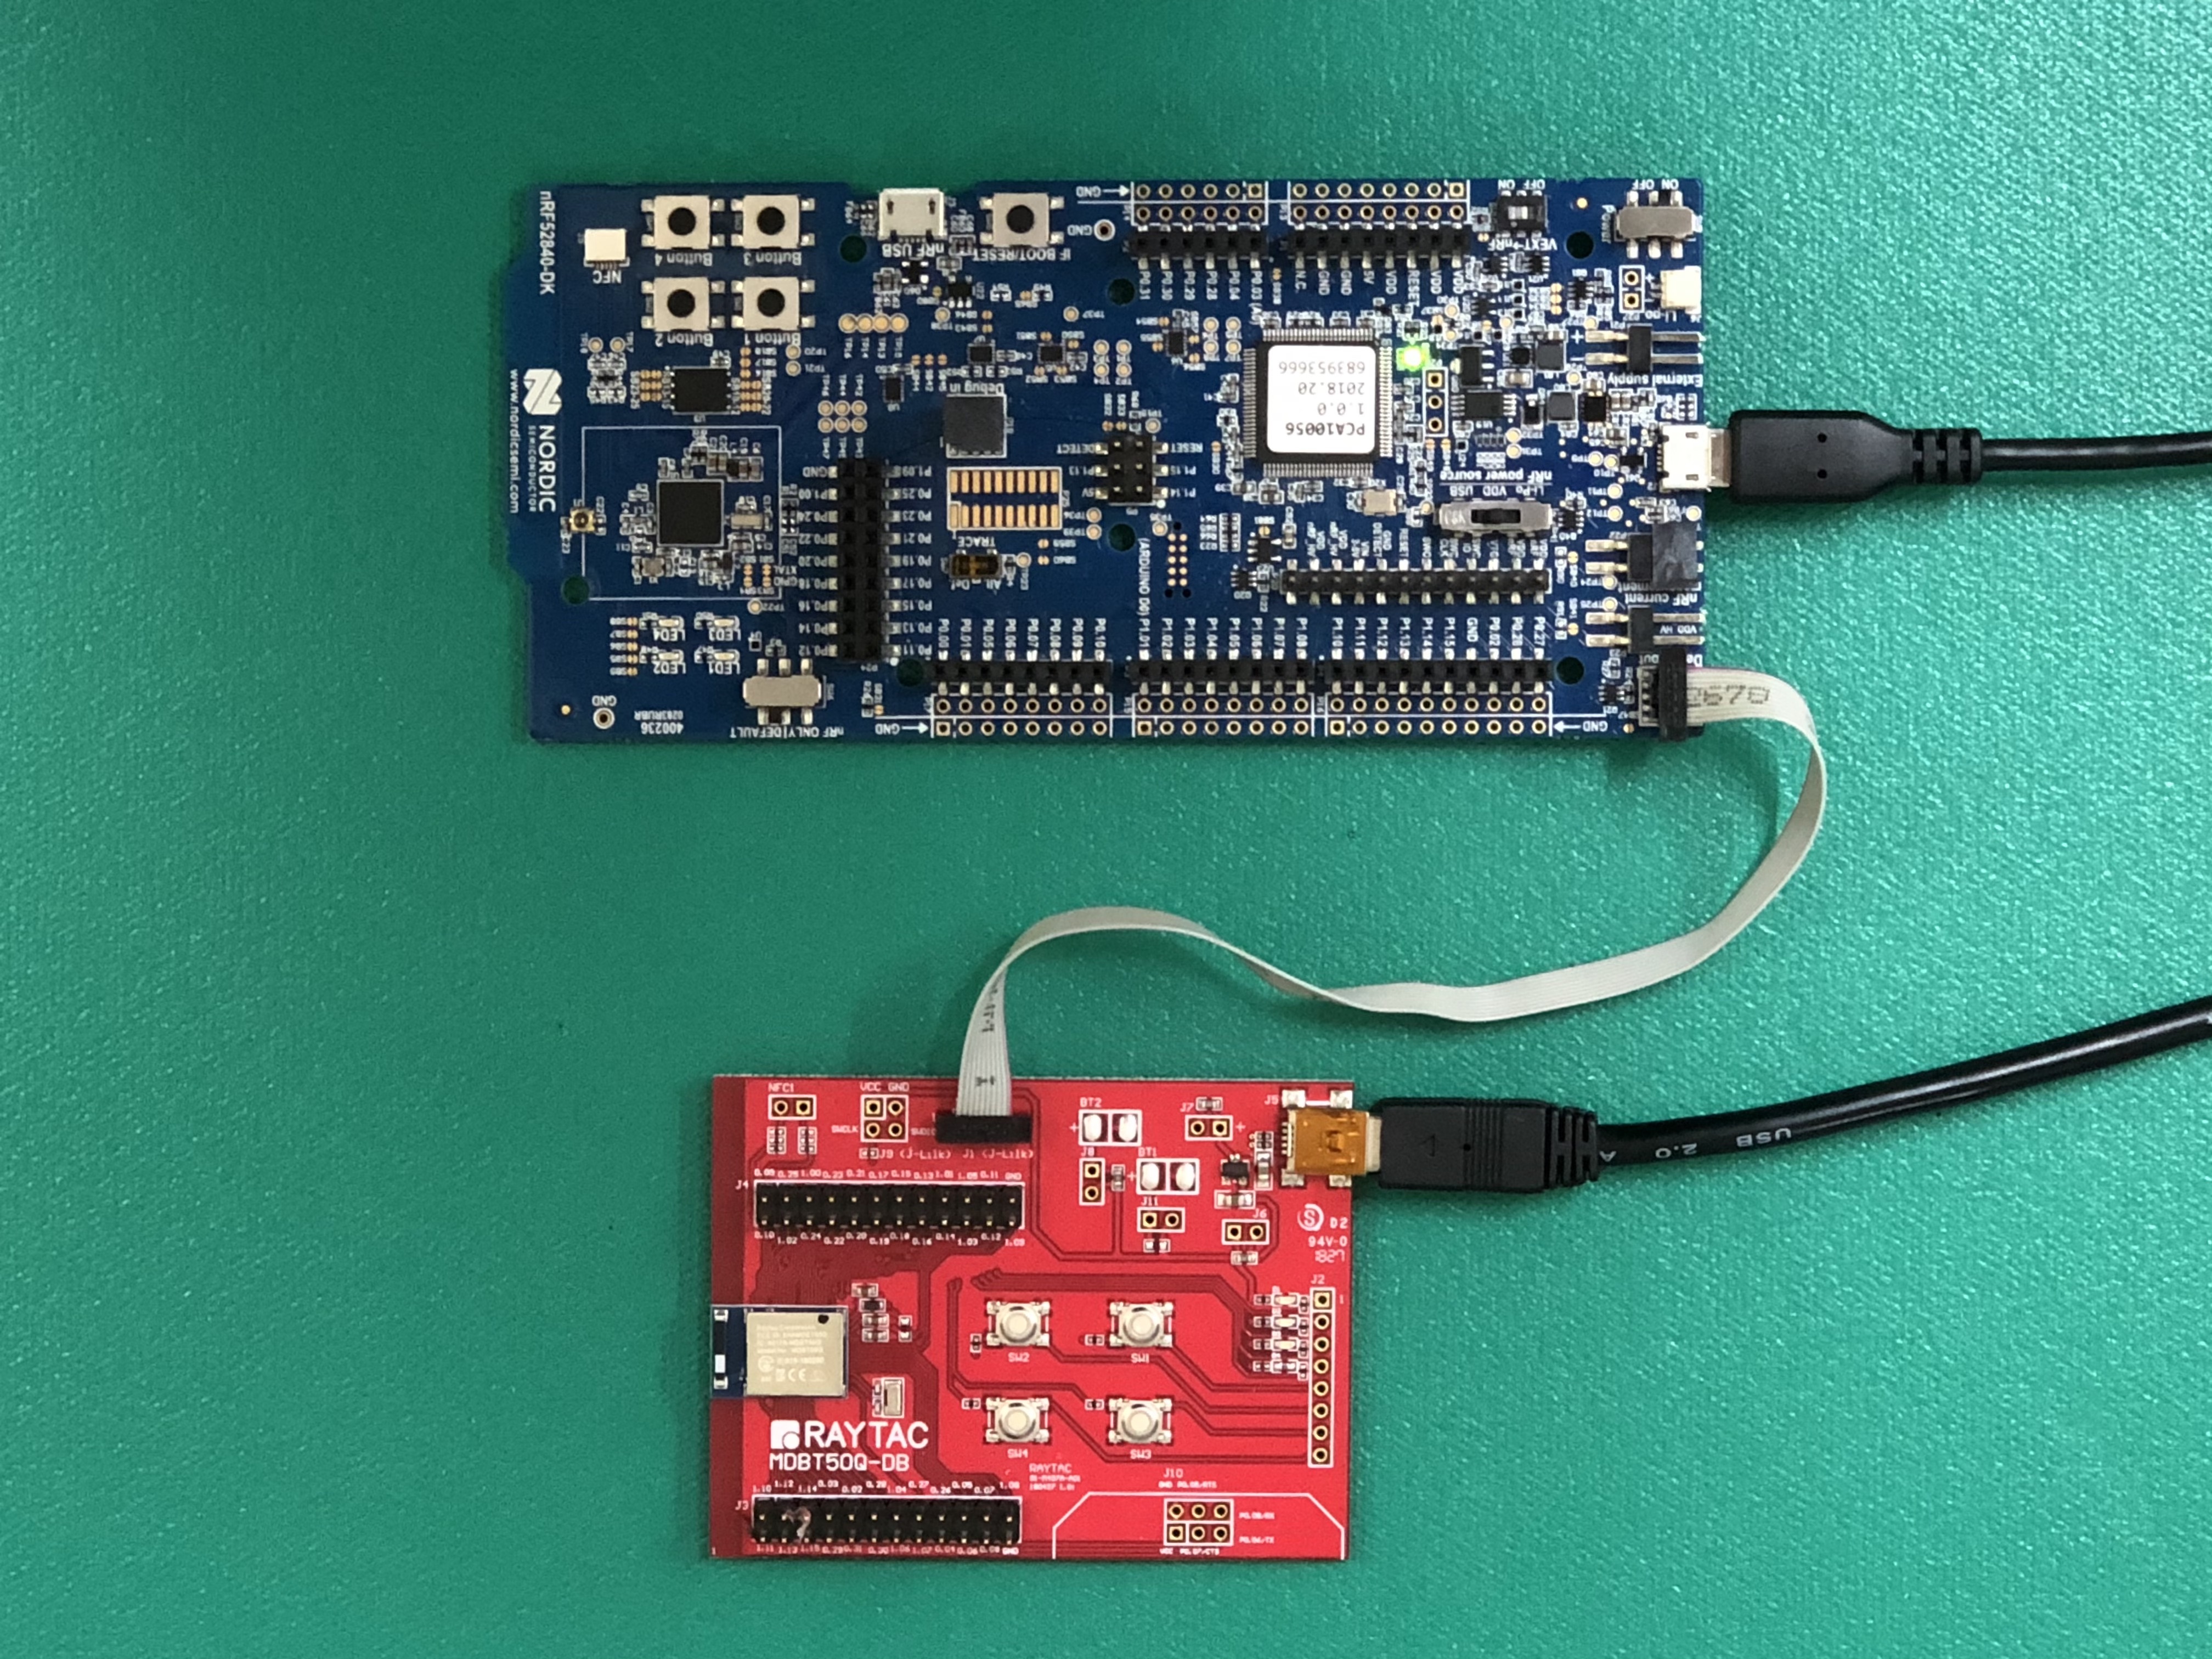
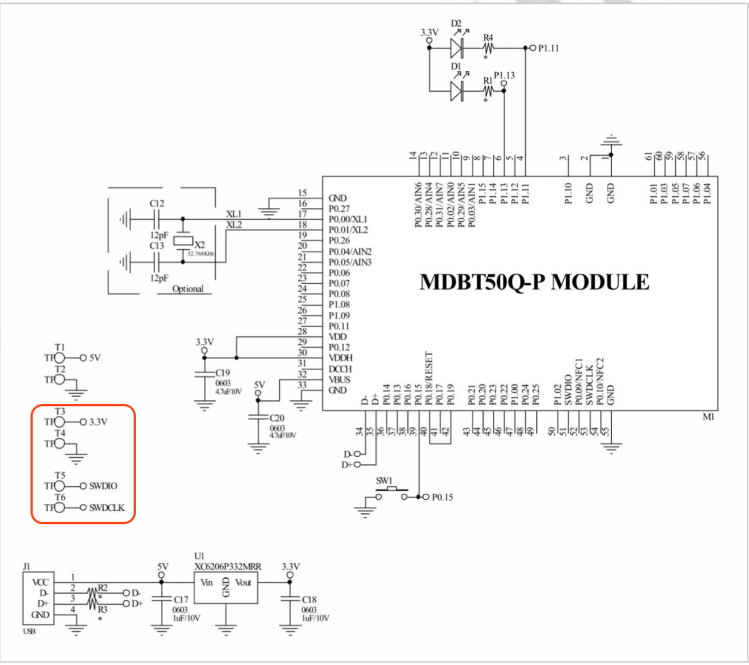
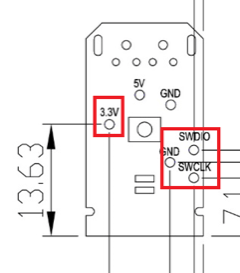
Connect Nordic NRF52-DK/NRF52840-DK Connect with MDBT50Q-DB-40 by IDC Wire

※Note: PCA10056 (NRF52840-DK) / PCA10040 (NRF52832-DK) / PCA10100(NRF52833-DK)

Power up MDBT50Q-DB-XX using Mini USB

IMG_0064.jpg
MDBT50Q-DB-40

MDBT50Q-DB-40 Schematic:

MDBT50Q Demo Board Schematic-V2.jpg

MDBT50Q-DB-33 Schematic:

MDBT50Q-DB-33 Schematic


1.2 Software kits resources & preparations

Resources:

Download nRF Connect For Desktop (Please Click Me)

Download nRF Command Line Tools (Please Click Me)

Download NRF5 SDK (The latest V17.1.0) (Please Click Me)

Download Visal Studio Code(Please Click Me)

Preparations:

Option 1.  NRF5 SDK (The latest version V17.1.0)

  1. 1.0_ddde560\components\softdevice\s140\hex\ s140_nrf52_7.2.0_softdevice.hex
  2. 1.0_ddde560\examples\ble_peripheral\ble_app_uart\pca10056\s140\arm5_no_packs\_build\ nrf52840_xxaa.hex

*Tips: If you go with nRF5 SDK option, please consider to add a bootloader hex file if you’re going to make DFU requests in the future.

Option 2.  NCS (Recommended version V2.6.0)

螢幕擷取畫面 2024-06-04 161138

2A.  Find “Toolchain Manager” in app nRFConnect for Desktop

螢幕擷取畫面 2024-06-04 161251

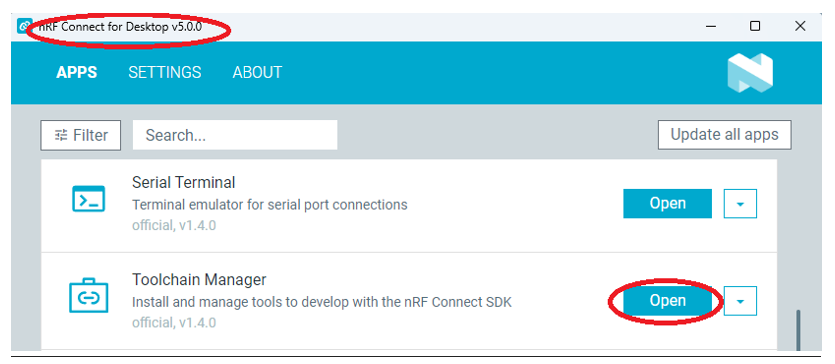
2B.  Install nRFConnect SDK V2.6.0 to your working site.

螢幕擷取畫面 2024-06-04 161333

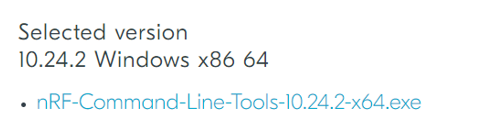
2C. Prepared with the latest version of nRF Command Line Tools
螢幕擷取畫面 2024-06-04 161627
 
**Note: SEGGER J-LINK Upgrade message might pop up while you’re doing above download.
螢幕擷取畫面 2024-06-04 161724
 
2D. Locate all the necessary kits for programming in PC

螢幕擷取畫面 2024-06-04 161810


1.3 Flash the ready firmware into Raytac’s module

Intro:

With the ready built code of zephyr.hex (Made through NCS) or nrf52840_xxaa.hex & s140_nrf52_7.2.0_softdevice.hex (Made through nRF5-SDK) file for application, we would like to move onto  flashing code into the MDBT50Q BLE module(mounted on MDBT50Q-DB-XX demo board).

Step1.  

Execute nRF Connect >>  Programmer  > > Open
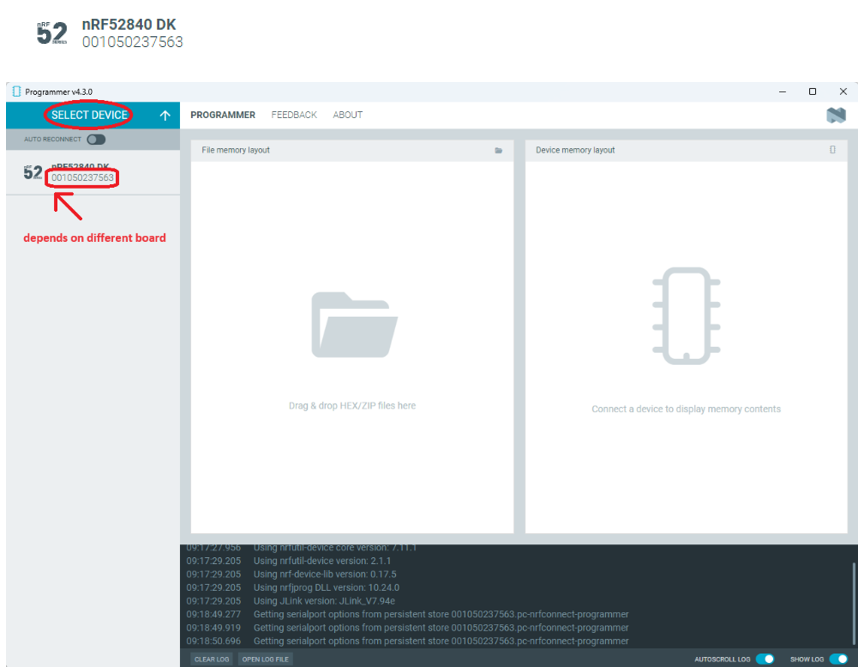
螢幕擷取畫面 2024-06-04 161858

Step2.

Click “SELECT DEVICE” >> Find icon “nRF52840 DK” which is detected by the programmer app
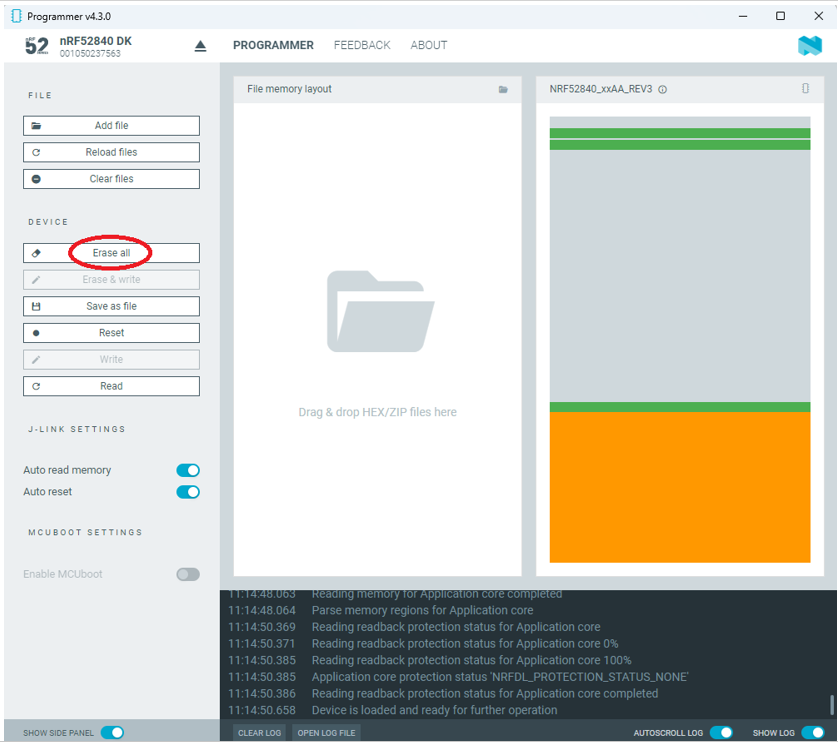
螢幕擷取畫面 2024-06-04 162005

Step3.

Click “nRF52840 DK”>> “Erase All” to remove flash memory inside MDBT50Q BLE Module
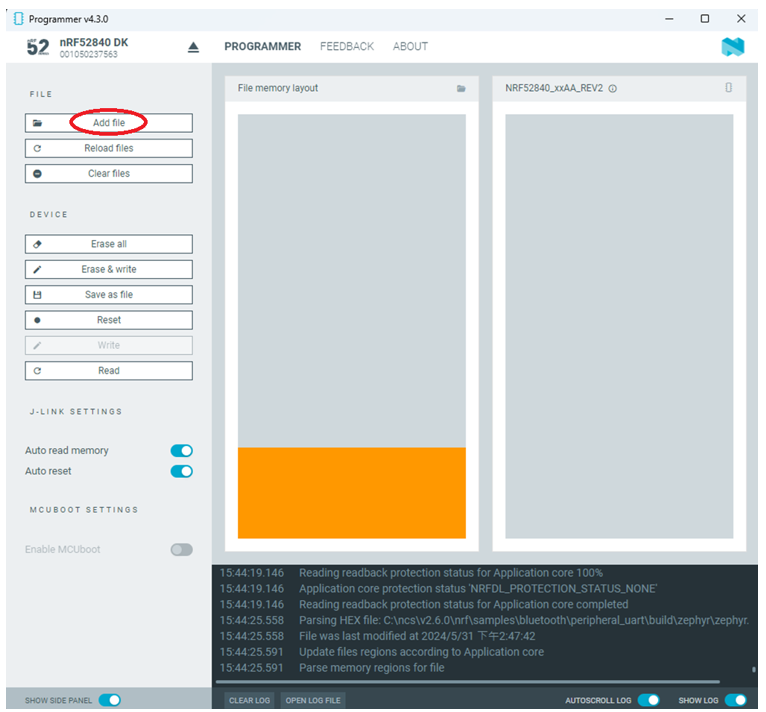
螢幕擷取畫面 2024-06-04 162106

Step4.

Click “Add File” to load application zephyr.hex into programmer
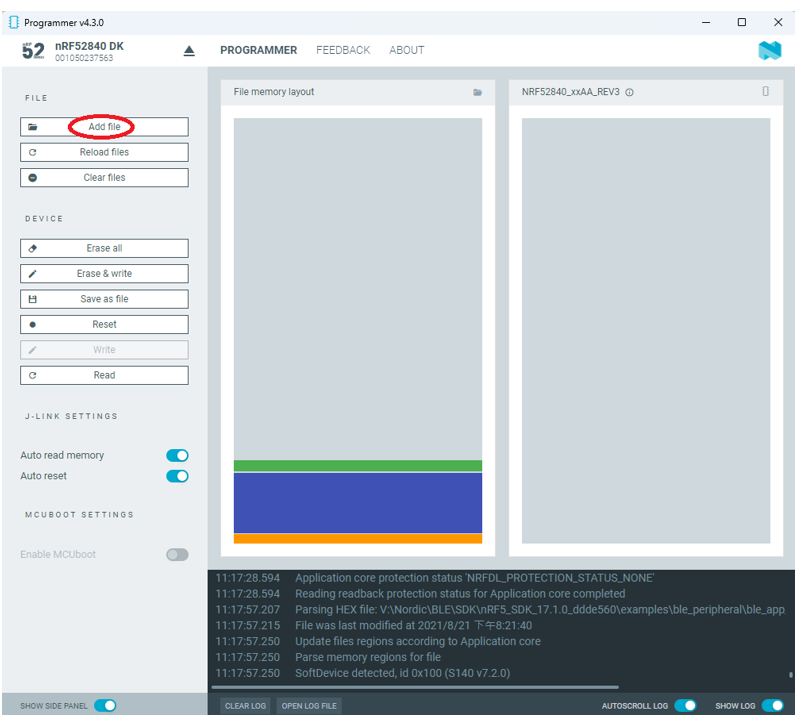
螢幕擷取畫面 2024-06-04 162202

!! Important Tips:!!


  • If you’re using nRF Connect SDK for code compiling as above, Program the hex file to MDBT50Q BLE module on the MDBT50Q-DB Demo board:
    – C:\ncs\v2.6.0\nrf\samples\bluetooth\peripheral_uart\build\zephyr\zephyr.hex
  • If you’re using NRF5 SDK for code compiling, do make the 4-in-1 hex file (merged ready) before programming it to MDBT50Q BLE module.  It includes the 4 hex files below:

(1) bootloader.hex

(2) bootloader_setting_file.hex

(3) s140_nrf52_7.2.0_softdevice.hex

(4) nrf52840_xxaa.hex

螢幕擷取畫面 2024-06-04 162300


1.4 DFU to MDBT50Q-DB-XX through USB interface

Intro : Before DFU implement , Please make sure the bootloader file has been installed in your MDBT50Q BLE module.

※Note: NRF52840 SoC supports USB interface to utilize Device Firmware Update (DFU).

How do I prepare the software??

  • Download nrfutil.exe file from Nordic website .
  • It is workable to do List, Program, Recover, Erase, and operations with nRFutil device command to Nordic device.
  • Open DOS mode to install device command type: nrfutil install device

(Jocelyn) How To Use NRF52840 NRF52833 module Dev Kit (MDBT50Q Series) 2024 version - Release file

How do I setup the hardware??

  1. Press Switch 4 and hold
  2. Power up Demo Board
  3. Blue LED Lights on
  4. Demo Board successfully enters into USB DFU Mode

螢幕擷取畫面 2024-06-04 162504

How do I prepare the firmware??

**USB DFU works only in DOS mode.

**USB DFU only works when USB Bootloader installed in current loaded firmware (inside BLE Module)

A single, merged 4-in-1 hex file is required, which includes:

Bootloader, Bootloader setting, Softdevice, and Application.

Firmware DFU requires a .zip file.

USB DFU Execution Steps:

Step 1. When Blue LED Lights on with MDBT50Q-DB (Ready to enter USB DFU Mode)

Step 2. Find out Com Port No. “nRF52 SDFU USB(COMxx)”

螢幕擷取畫面 2024-06-04 162542


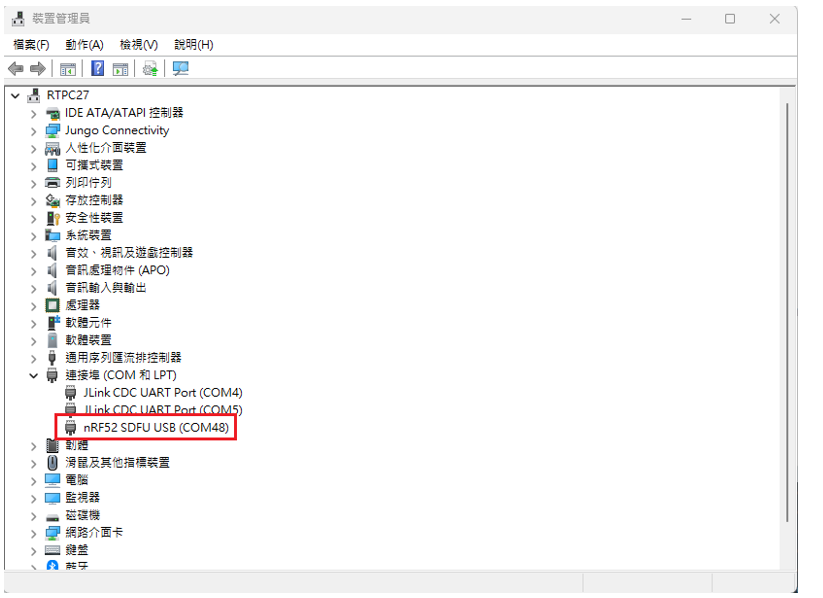
Step 3. Execute USB DFU

Option 1. Using device program command:

(1) List the devices with a DFU trigger interface by running:

nrfutil device list –traits nordicDfu

Option1-1

(2) Program new firmware to a device identified by its serial number by running:

nrfutil device program –firmware .zip nrf52840_xxaa.zip –serial-number XXXXXXXXXXXX

Option1-2

MDBT50Q-RX, a nRF52840 USB Dongle, delivers an easy implement for M2M IoT application

Raytac's MDBT50Q-RX, a Nordic nRF52840 USB Dongle

Raytac’s BT5 certified nRF52840 USB dongle, MDBT50Q-RX, eliminating the need for RF design expertise, and speeding time to market for complex M2M IoT applications. The Dongle built by Raytac’s MDBT50Q-P1M module with FCC/IC/CE/Telec/KC/SRRC/NCC/RCM/WPC certification.

Raytac's MDBT50Q-RX, a Nordic nRF52840 USB Dongle
Raytac’s MDBT50Q-RX, a Nordic nRF52840 USB Dongle

Where To Buy Raytac Bluetooth Module Sample?

To enhance the accessibility to Raytac BLE module sample for evaluation and development, Raytac has put effort to corporate with several channels.

Differ channels may carry various items, we encourage developers firstly visiting Raytac official site. The easy link options listed in each product may help customers to select the friendly channel to approach.

螢幕快照 2019-01-21 09.58.27

Come to visit Raytac at Embedded World #Hall 3 / 3-520

With over 1,000 exhibitors gathering in Nuremberg, Germany on 26 Feb.~29 Feb., 2019 , Embedded World has become one of  the biggest trade fair among the IoT Technologies.

RAYTAC27-20181220_lo

Raytac Released nRF52840 USB Dongle “MDBT50Q-RX"

Raytac released nRF52840 USB Dongle which deployed MDBT50Q-P1M module offers a Bluetooth 5 specification granted, FCC/IC/Telec(MIC)/KC/SRRC/NCC/WPC pre-certified, and CE/RCM compliant solution.

Raytac nRF52840 Dongle MDBT50Q-RX
Abstract molecule structure on dark blue color background. Vector illustration of Communication – network for futuristic technology concept

Bluetooth Project: How to program your firmware to module

After setup been done, here comes the next question: How to program the firmware in to the module. We are using some simple instruction in below for reader’s quick reference.

Hardware

You will need a Nordic nRF5X DK or a Segger J-link as programmer to load the firmware. To use Nordic nRF5X DK to debug the SoC as well, you will need to order corresponding nRF5X DK to match the SoC number. For example, order nRF52840 DK to debug nRF52840 SoC or order nRF52 DK to debug nRF52832/52810 SoC. But if you are only using it as programmer, any version of nRF5X DK will work as we only use the J-link on this board.

Software

Please download Nordic nRFGo Studio for programming. Remember to install nRF5X Command Line Tools if the board was not detected by nRFGo Studio. Once they are all connected, you can then start programming. Please make sure to “erase all” every time before programming.

For more tutorials and demo of sample code, please visit Nordic’s DevZone and Infocenter where have ample resources to utilize.

Programing 

SoftDevice + Application

  1. Erase all first. Then program Softdevice and follow by Application code.
  2. Or you may combine code as stated in above. Erase all and follow by programing the combined code.

SoftDevice + Bootloader+ Application

  1. Either Erase all first.  Program the Softdevice and follow by Bootloader. and then use DFU to update the application code.
  2. Or suggested having a combined code (SofDevice+Application+Bootloader) for program. Simply erase all and follow by programming the combined code.
*Remark
Bootloader is needed for DFU (OTA) Function.
SDK 11 (included) and before – a legacy DFU method, which is simple but less security
SDK 12 (Included) and after – a latest DFU method, which has higher security.

To easy customer’s IoT device mass production, Raytac provide code pre-program service into module before shipment.  There are requirements listed in below for customers who need the service!

  1. A single, combined hex file is required. Please combine softdevice and application or/and bootloader (depending on your firmware design) together before programming. This will shorten programming time and help to manage your code easier. If you are not familiar with merging firmware, please download the instruction from the link:     https://mega.nz/#!Qg5UBJTQ!POWmmNNdapGqefHpB10YjpcuExLWwXnxDfBzcVrsTOw
  2.  Need a simple method to check programming status. The easiest way is to check the device name if device will broadcast device name after programming is done; or use I/O to trigger LED and its behavior. This does not aim to test any or full function of your device, only a simple method for the operator to know programming status.

nRF52840 MDBT50Q Module

Raytac Corporation 勁達國際電子股份有限公司
A company of Abietec
Bluetooth & WiFi module maker based on Nordic nRF54, nRF53, nRF52, nRF7002 solution
BT5.4 &BT5.3 & BT5.2 & BT5.1 Qualified, FCC/IC/CE/Telec/KC/RCM/SRRC/NCC Pre-Certified. Bluetooth Solution: nRF54, nRF5340, nRF52840, nRF52833, nRF52832, nRF52820, nRF52811, nRF52810, nRF52805, nRF51822 WiFi Solution: nRF7002
www.raytac.com
email:service@raytac.com
Tel: +886.2.3234.0208

Bluetooth Project: How to get your firmware development started!

Setting up Nordic’s IDE (Integrated Development Environment) is the first step into Bluetooth product development, and it’s also where most developers need support.

In order for developers to be able to smoothly set up their IDE, Raytac hereby provide you with a few easy steps.

First and foremost – In terms of IDEs, there are currently four different ones that are all viable; Segger Embedded Studio (SES), Keil C, IAR and GCC. Among these, SES and GCC are IDEs free of charge while Keil C and IAR both require the developer to pay a license fee to their respective company.

We at Raytac generally recommend SES, as it is an IDE brought forth by both Nordic and Segger together and it uses Segger J-Link. Although GCC is a free IDE, it only builds code and is impractical editting make file or debugging firmware. Thus, it’s not our primary choice.

Therefore, we will hereby provide you a step-by-step guide on how to set up your IDE when using SES.

  1. Where to download SES?

https://www.segger.com/downloads/embedded-studio/

圖片 1.png

  1. Where to Nordic SDK ( Use SDK v15.0.0 as an example)

https://developer.nordicsemi.com/nRF5_SDK/nRF5_SDK_v15.x.x/

  1. Install SES V3.34 and unzip SDK v15.0.0

After SES installed, you may find “Non-Commercial License" 

圖片 4.png

  1. SES License Key? http://license.segger.com/Nordic.cgi
  2. How to get free License Key?

Key in Name, Company name, Address and PC’s MAC address. Then press “Request License", the “License key" will send to your mail box automatically.

Tips: How look up PC’s Mac address: Pls enter DOS mode, 

Key in ipconfig/all,

The Mac address will be found in Ethernet card.

圖片 7.png

  1. Copy the license key from mail

圖片 8

  1. Execute SES and find out the “License Manager" in “Tools" option

圖片 9

  1. Select “Activate Embedded Studio", Paste the “License Key", Click “Install License"

圖片 10.png

  1. When completed, click"Manage Activation",shown “License key" well installed.

圖片 11

圖片 12.png

CMSIS Configuration Wizard,

  1. Select “Open Solution" in SES’s File option to open SDK v15.0.0 project

..\examples\ble_peripheral\ble_app_uart\pca10040\s132\ses\ble_app_uart_pca10040_s132.emProject 

圖片 13圖片 14

  1. Select “Open Studio Folder" in SES’s File option, then select “External Tools Configuration". You may find the display as below screen shot. Pls paste the below command. (The command can also be found in below link)

https://infocenter.nordicsemi.com/index.jsp?topic=%2Fcom.nordic.infocenter.sdk5.v15.0.0%2Fsdk_config.html&cp=4_0_0_1_6

圖片 15.png

圖片 16

  1. Please save the “tools.xml". Afterward, developers may able start over build code and debug works.

Build Code & Debug

Raytac Corporation 勁達國際電子股份有限公司
A company of Abietec
Bluetooth & WiFi module maker based on Nordic nRF54, nRF53, nRF52, nRF7002 solution
BT5.4 &BT5.3 & BT5.2 & BT5.1 Qualified, FCC/IC/CE/Telec/KC/RCM/SRRC/NCC Pre-Certified. Bluetooth Solution: nRF54, nRF5340, nRF52840, nRF52833, nRF52832, nRF52820, nRF52811, nRF52810, nRF52805, nRF51822 WiFi Solution: nRF7002
www.raytac.com
email:service@raytac.com
Tel: +886.2.3234.0208