Raytac’s Impact on the Zephyr Ecosystem – Little Module, Huge Potential

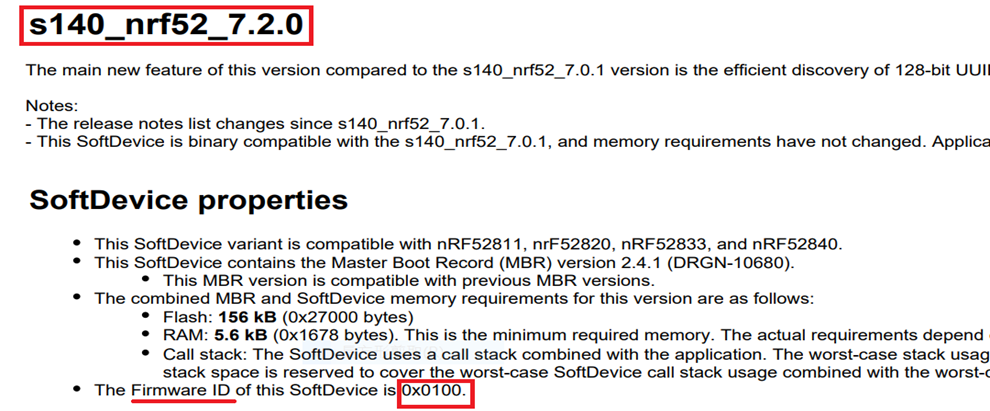
In this article, Stanley Huang, MSc, Deputy Manager of Firmware Development at Raytac, shares insights on how Raytac’s modules and development kits strengthen the Zephyr ecosystem.

[Stanley Huang, New Taipei City]
When we talk about open-source platforms like Zephyr RTOS, most people immediately think of major chip manufacturers such as ST Micro, NXP, or Nordic. But to me, what truly makes Zephyr famous amongst the developer community is through modules that developers can actually touch: those they can instantly plug in and start using right away. In these terms, Raytac is one of the most underrated and important contributors in this ecosystem.

Raytac Modules Make Zephyr More Accessible
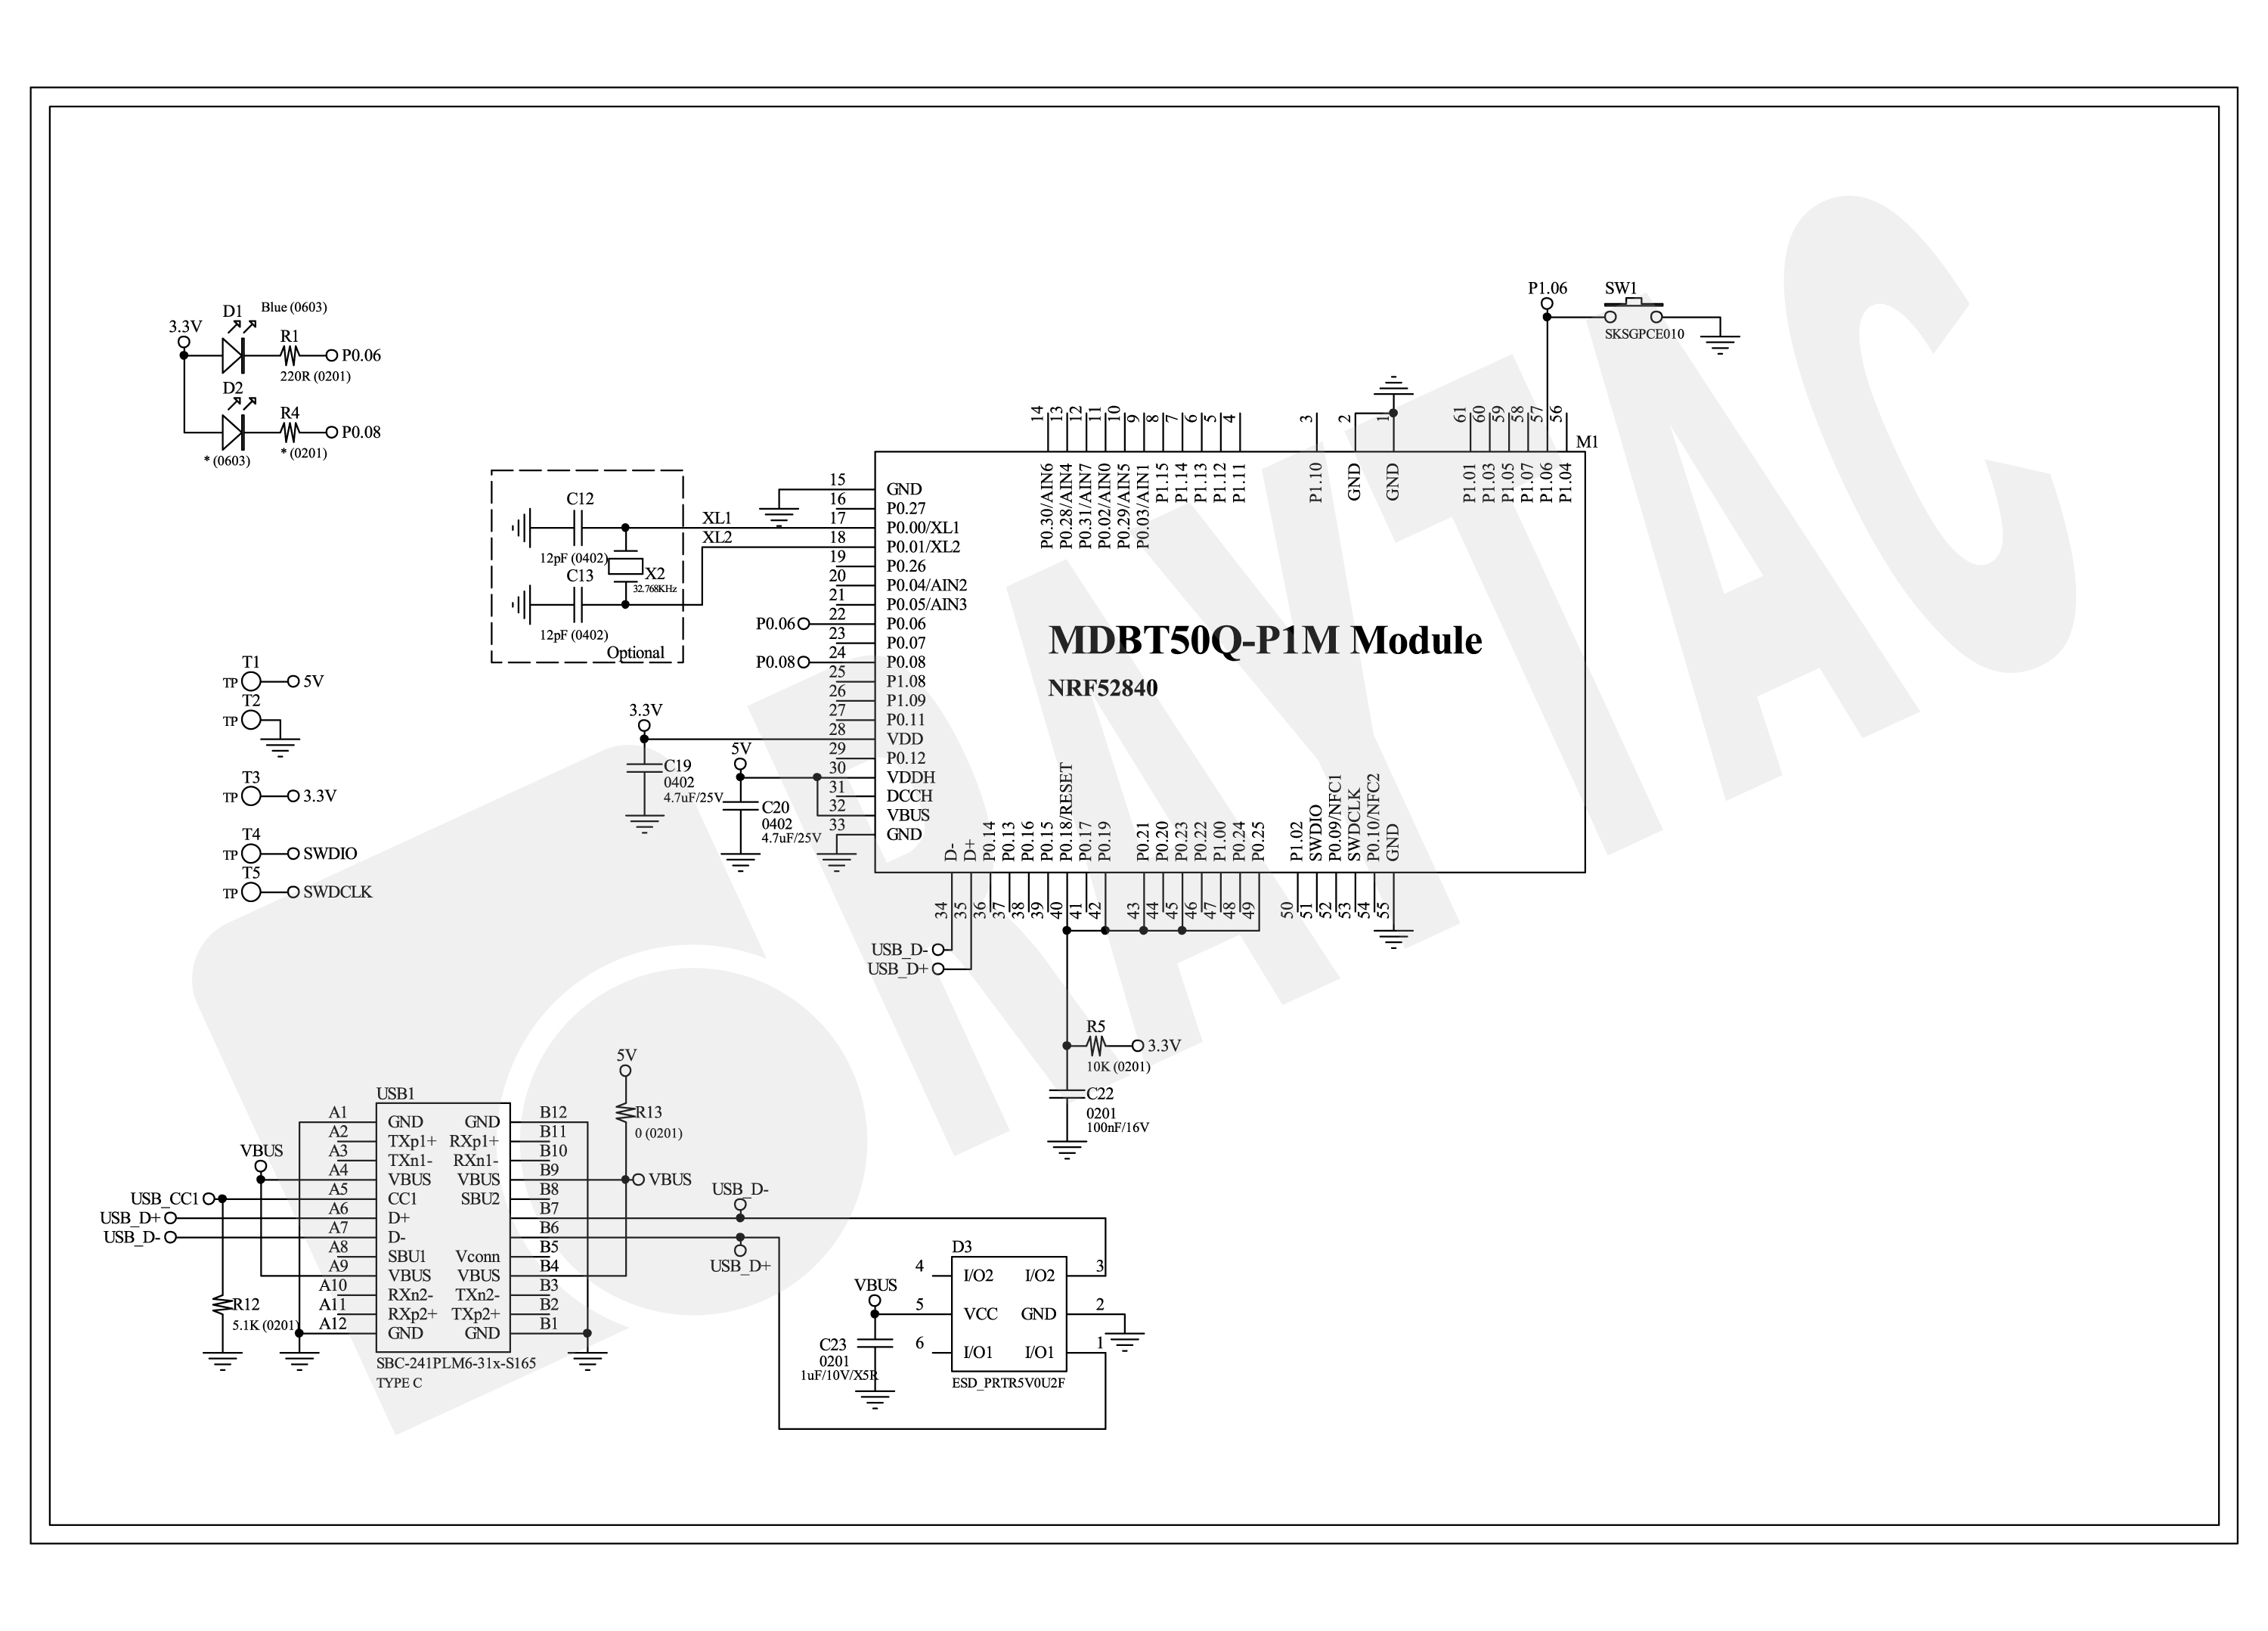
Instead of being a chip vendor, we specialize in producing high-quality, globally certified modules – especially Bluetooth and Wi-Fi modules based on Nordic chipsets, such as the AN7002Q, AN54LQ, AN54LV, MDBT53, MDBT50Q, and MDBT42Q.
All these modules are already certified with Regional RF compliances(FCC, IC, CE, KC, etc.) and the latest Bluetooth Specifications, offering developers the assurance of “plug and play” and “production-ready” solutions.
We assure that our modules have become one of the easiest platforms for Zephyr developers to test BLE functionality.

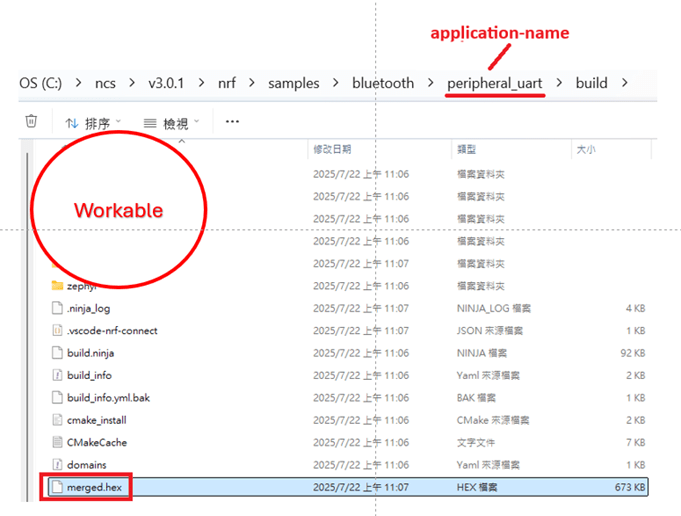
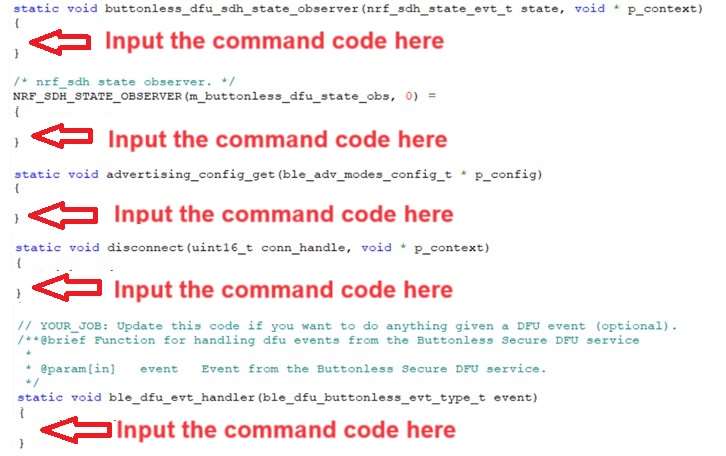
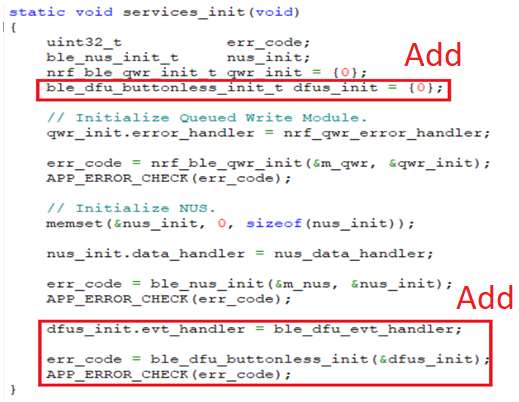
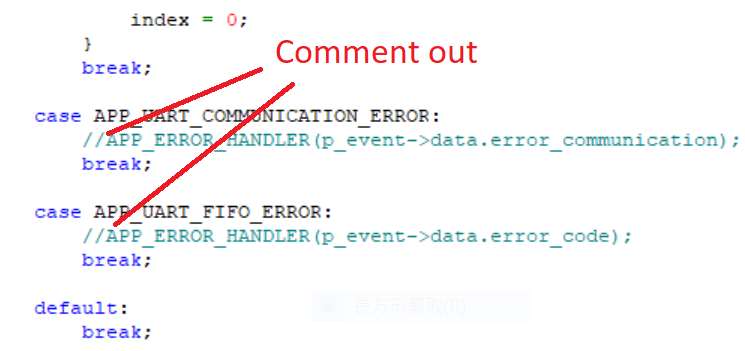
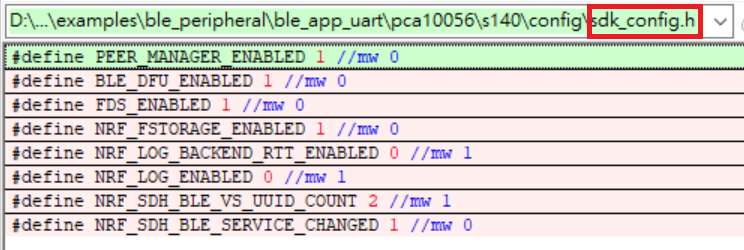
I paired Zephyr with Raytac’s MDBT50Q-DB-40 development board when I first applied Zephyr in a BLE Peripheral project . With a simple west build -b nrf52840dk_nrf52840 followed by flashing the firmware using J-Link or nRF Connect for Desktop, the BLE beacon immediately showed up on my phone. Clean, simple, noise-free, and developer-friendly – that’s Raytac’s style.

Modules play an invaluable role in product development
Many would say Raytac only makes modules and the real core is still Nordic’s SoC.
But I believe that in an open-source system like Zephyr, the hardware that helps your project runs first is that which contributes the most.
Our Zephyr-registered development kits eliminate the hassles of manual soldering, regulatory certification, and antenna design, allowing engineers to fully focus on developing applications based on Zephyr.
They can run Zephyr’s BLE peripheral, central, GATT, and HCI samples directly on the Raytac kits that act as a one-stop hardware solution.
In many ways, Raytac has pushed Zephyr’s usability a significant step forward.

Raytac Also Expands Zephyr’s Application Horizon
Many of Raytac’s modules are ultra-compact- ideal for wearables, smart sensors, and low-power beacons…etc. These are the scenarios where Zephyr excels, and Raytac’s modules provide the physical platform to enable companies to build their “dream devices".
When running Zephyr on a tiny module like the AN54LV-15(Product Link), developers will be amazed that something smaller than a piece of corn kernel can run a full RTOS, manage the BLE stack, trigger timers, drive I2C sensors, and even connect to the cloud, all by itself.  This combination doesn’t just make development easier – it inspires developers to realize that: “they can build their projects using Raytac’s hardware.”

Raytac may not be the star, but we’re always ready for you
On Zephyr’s main stage, companies like Nordic, STM, and Intel take the spotlight, but Raytac plays an essential supporting role – supporting the performance from behind the scenes. We offer stable, high quality, and low-power platforms, giving every line of Zephyr code a place to run and every feature a cornerstone.
Our greatest value lies in helping developers skip antenna design and RF interference concerns – so they can jump right into the Zephyr ecosystem with ease.

Our products deliver the reliability you need and the efficiency you expect.

We invite you to explore more about how Raytac supports the Zephyr ecosystem and discover our range of development kits and modules designed for seamless integration.
Visit our Zephyr page here: https://docs.zephyrproject.org/latest/boards/raytac/index.html
Visit Zephyr’s Ecosystem Vendors page: https://www.zephyrproject.org/ecosystem-vendor-offerings/

For more information, please contact:
Raytac Contact Form: https://www.raytac.com/contact/
Raytac Sales email: sales@raytac.com
abietec Service email: service@abietec.com


Article by Firmware Deputy Manager: Stanley Huang
Edited by Business Development Manager: Tony Yin

Raytac Corporation 勁達國際電子股份有限公司 / Raytac Corporation (USA) / abietec Inc.
A Bluetooth, Wi-Fi, and LoRa Module Maker/ODM & OEM Manufacturer based on
Nordic nRF54; nRF53: nRF52; nRF51; nRF7002
Semtech Specification: SX1262

Bluetooth Specification: BT6 ; BT5.4 ; BT5.3 ; BT5.2.
Wi-Fi Specification: Wi-Fi 6
LoRa Specification: LoRaWAN


All products are FCC/IC/CE/Telec/KC/RCM/SRRC/NCC/WPC/RoHS/Reach Pre-Certified.
http://www.raytac.com
https://www.raytac.com/contact/
email: sales@raytac.com
Tel: +886-2-3234-0208(TW)/+1-626-217-3139(USA)

Essential Tips for nRF54L15 HEX File Verification

Hi readers, did you know that Raytac offers a special service exclusively for our customers? 😉
We offer support services: HEX file verification and flashing firmware into modules per customer’s requests.
Compared to the series nRF52 and nRF53’s 2 in 1 or 3 in 1 merged hex files, nRF54L15 requires something slightly different. Following are the tips and suggestions.

Before building your own .hex file on Raytac’s nRF54L15 modules(Product link), please configure some settings(shown below) in advance.

In VS Code:

  1. Go to Add Build Configuration
  2. Find System Build (sysbuild) ➝ Choose Build System Default
  3. Click Generate and Build


Starting from NCS v2.8.0 (including later versions), the .hex file can be generated in two different paths.
1. ..\nrf\samples\bluetooth\application-name\build\merged.hex
2. ..\nrf\samples\bluetooth\application-name\build\application-name\zephyr\zephyr.hex


Using the AN54LQ/AN54LV series as an example:
When you provide the programming file (.hex) for production, please ensure that the file is taken from the following path:
1. ..\nrf\samples\bluetooth\application-name\build\merged.hex
And we also do not recommend renaming the merged HEX file due to Nordic suggestions.

For more details behind this suggestion, please refer to the Nordic DevZone link below.
https://devzone.nordicsemi.com/f/nordic-q-a/120313/how-to-modify-the-name-of-the-merged-hex-file


Suggested path:
1. ..\nrf\samples\bluetooth\application-name\build\merged.hex

Not recommended path:
2. ..\nrf\samples\bluetooth\application-name\build\application-name\zephyr\zephyr.hex
The zephyr.hex file is not recommended to be used for flashing or verification in the production process.

Thank you all for your patience in reading!
Best wishes for your projects – your success is Raytac’s success! 😊


For more information, please contact:
Raytac Contact Form: https://www.raytac.com/contact/
Raytac Sales email: sales@raytac.com
abietec Service email: service@abietec.com


Edited by Account Manager: Ms. Elfreda Guo


Raytac Corporation 勁達國際電子股份有限公司 / Raytac Corporation (USA) / abietec Inc.
A Bluetooth, Wi-Fi, and LoRa Module Maker/ODM & OEM Manufacturer based on
Nordic nRF54; nRF53: nRF52; nRF51; nRF7002
Semtech Specification: SX1262


Bluetooth Specification: BT6 ; BT5.4 ; BT5.3 ; BT5.2.
Wi-Fi Specification: Wi-Fi 6
LoRa Specification: LoRaWAN


All products are FCC/IC/CE/Telec/KC/RCM/SRRC/NCC/WPC/RoHS/Reach Pre-Certified.
http://www.raytac.com
https://www.raytac.com/contact/
email: sales@raytac.com
Tel: +886-2-3234-0208(TW)/+1-626-217-3139(USA)

Nordic’s nRF54L15/L10/L05 BLE Modules from Raytac now in Mass Production

Raytac AN54LQ series Modules: Guiding Your Project at Every Turn, While Saving Power at Every Step

[28/07/2025, New Taipei, Taiwan]
We are proud to officially announce Mass Production (MP) for Raytac’s next-gen Nordic-based Bluetooth LE modules:

Just like traffic lights that direct every journey safely and efficiently, Raytac’s nRF54L series modules guide your wireless development—keeping you on the right path with cutting-edge performance and exceptional power savings.

🚦 Each light signals a different member of the nRF54L15 / nRF54L10 / nRF54L05 module family—showcasing a clear path for your Bluetooth Low Energy (LE) applications, no matter which industry you’re from and where you’re headed.

These modules are now available for your design-in, offering:
✅ Powerful performance
✅ Ultra-low power consumption
✅ Compact footprints
✅ Full Global certifications: FCC/IC/CE/UKCA/Telec/KC/NCC/SRRC/RCM/WPC
✅ BT 6.0 certified
✅ Full Nordic nRF54 Series compatibility
✅ Pin-to-pin compatible amongst AN54LQ series

Whether you’re building for consumer IoT, industrial sensors, healthcare, or wearables—Raytac’s modules deliver the reliability you need and the efficiency you expect.

For more information, please contact:
Raytac Contact Form: https://www.raytac.com/contact/
Raytac Sales email: sales@raytac.com
abietec Service email: service@abietec.com


Edited by Business Development Manager: Tony Yin


Raytac Corporation 勁達國際電子股份有限公司 / Raytac Corporation (USA) / abietec Inc.
A Bluetooth, Wi-Fi, and LoRa Module Maker/ODM & OEM Manufacturer based on
Nordic nRF54; nRF53: nRF52; nRF51; nRF7002
Semtech Specification: SX1262

Bluetooth Specification: BT6 ; BT5.4 ; BT5.3 ; BT5.2.
Wi-Fi Specification: Wi-Fi 6
LoRa Specification: LoRaWAN


All products are FCC/IC/CE/Telec/KC/RCM/SRRC/NCC/WPC/RoHS/Reach Pre-Certified.
http://www.raytac.com
https://www.raytac.com/contact/
email: sales@raytac.com
Tel: +886-2-3234-0208(TW)/+1-626-217-3139(USA)

nRF52840 Nordic SoC USB Dongle – MDBT50Q-CX-40, Now Supports Zephyr RTOS

Zephyr RTOS hosted in Linux system has become a leading IoT ecosystem and it has been widely adopted as an open-source , real-time operation system for embedded devices, making it easier for developers to integrate the project smoothly.

Nordic Semiconductor , a main contributor to Zephyr, from the Bluetooth LE controller and USB stack to test tools, DFU frameworks.. and more, is making great effort and strategic decisions to adopt the Zephyr open-source into its nRFConnect(NCS) SDK program.

Raytac Corporation , a hardware-based manufacturer and a comprehensive solution developer with Nordic SoC development for multi-protocol complied wireless modules, now expands support for Zephyr RTOS ecosystem with its nRF52840 USB-C dongle – MDBT50Q-CX-40.

Zephyr support package for MDBT50Q-CX-40: https://docs.zephyrproject.org/latest/boards/raytac/mdbt50q_cx_40_dongle/doc/index.html


Reminder: The current Nordic released NCS SDK may NOT upgrade with Zephyr package at the same pace ; It is recommended to get the latest NCS SDK version to access the complete Zephyr support package.

If you’re interested in how Zephyr becomes powerful for a developer to start a project design easier and how the Nordic nRFConnect SDK community brings you to the world of Zephyr RTOS system, never hesitate to save the spot in the upcoming webinar on July 2nd, 2025. How Zephyr became the leading open-source RTOS for IoT (Click on the link to know more)

Resources:
– Begin your journey with Nordic nRFConnect SDK community – nRF Connect SDK Fundamentals
User Manual of MDBT50Q-CX (nRF52840/nRF52833-based USB-C Dongle)


Edited by Business Development Manager: Ms. Jocelyn Tsai


Raytac Corporation 勁達國際電子股份有限公司 / Raytac Corporation (USA)
A Bluetooth, Wi-Fi, and LoRa Module Maker/ODM & OEM Manufacturer based on
Nordic nRF54; nRF53: nRF52; nRF51; nRF7002
Semtech Specification: SX1262


Bluetooth Specification: BT6.1 ; BT6 ; BT5.4 ; BT5.3 ; BT5.2.
Wi-Fi Specification: Wi-Fi 6
LoRa Specification: LoRaWAN


All products are FCC/IC/CE/Telec/KC/RCM/SRRC/NCC/WPC Pre-Certified.
http://www.raytac.com
https://www.raytac.com/contact/
email: sales@raytac.com
Tel: +886-2-3234-0208(TW)/+1-626-217-3139(USA)

Secure DFU OTA for nRF52832 solution modules: Creating hex/zip file for implementation – Part 2(Combining/merging built files)

Following up – Part 1: Bootloader & Application (Click for article link),

We will be focusing on:

in this article.

IC: nRF52832
DK: PCA10040 (for nRF52832)
SDK: 16.0.0
Softdevice: s132_nrf52_7.0.1_softdevice.hex
IDE: Keil C
PC: Win 10


Step 1. Execute the combine batch file in bootloader (nrf52832_bootloader_setting_merge.bat) and generate file of nrf52832_bootloader_secure_combin_settings.hex :

@echo off
title = [ J-Link Tool ] %CD%
set nrfDir=C:\Program Files (x86)\Nordic Semiconductor\nrf5x\bin
set BS= nrf52832_bootloader_secure_settings.hex
set BL= nrf52832_xxaa_s132.hex
set BSBLCombind= nrf52832_bootloader_secure_combin_settings.hex
set path=%nrfDir%;%path%
pause
echo ———–merge image file——————-
mergehex.exe -m %BS% %BL% -o %BSBLCombind%
pause


Step 2. Create a Final.hex file by 3-in-1 batch file(nrf52832_3in1_merge.bat)
※Note : This hex file is created for the production line to pre-load firmware into modules prior to shipment.

@echo off
title = [ J-Link Tool ] %CD%
set nrfDir=C:UsersuserDesktopNordic BLEnRF5_merge toolsnRF52 bin
set SD= s140_nrf52_7.2.0_softdevice.hex
set BLT= nrf52832_bootloader_secure_combin_settings.hex
set APP= nrf52832_xxaa.hex
set SD_BLT=SD_BLT.hex
set Finalfile=Final.hex
set path=%nrfDir%;%path%
pause
echo ———–merge image file——————-
mergehex.exe -m %SD% %BLT% -o %SD_BLT%
pause
mergehex.exe -m %SD_BLT% %APP% -o %Finalfile%
pause


Step 3. Create a DFU(OTA).zip file of nrf52832_xxaa.zip
※Note : This zip file is created for end device DFU(OTA) implementation.

nrfutil pkg generate –hw-version 52 –sd-req 0xCB –application-version 0xFF –application
nrf52832_xxaa.hex –key-file private.pem nrf52832_xxaa.zip

The DFU OTA zip file will be derived.

※Note :
The “0xCB" appeared in the above DOS code(in red font) is the FWID(Firmware ID) for s140_nrf52_7.2.0_softdevice.hex;
FWID can be found from the soft device documents on the Nordic website.


Step 4: Run DFU OTA (On mobile in this example)


4A. Install the nRF Connect APP on mobile, with DFU OTA file: nrf52832_xxaa.zip. (Download link)


4B. Send nrf52832_xxaa.zip via email to mobile device after combination is done on PC, then download it.


4C. Open nRF Connect APP and run connection;


4D. Execute DFU and select “Distribution packet(ZIP)", thus starting the DFU OTA process.


4E. Start DFU OTA → exit the APP after DFU OTA is completed → restart the mobile device.


Secure DFU OTA for nRF52832 solution modules: Guide to create hex/zip file for implementation
Detailed links of articles:
Part 1: Bootloader & Application (Click for article link)
Part 2: Combining & merging built files


Technical guidelines provided by R&D Manager: Mr. MW Lee
Edited by Sales Manager: Ms. Mandy Chao


Raytac Corporation 勁達國際電子股份有限公司 
Raytac Corporation: A Bluetooth, Wi-Fi, and LoRa Module Maker based on
Nordic nRF54; nRF53: nRF52; nRF51; nRF7002
Semtech Specification: SX1262

Bluetooth Specification: BT5.4 ; BT5.3; BT5.2.
Wi-Fi Specification: Wi-Fi 6
LoRa Specification: LoRaWAN

All products are FCC/IC/CE/Telec/KC/RCM/SRRC/NCC Pre-Certified.
http://www.raytac.com
email: sales@raytac.com
Tel: +886-2-3234-0208

Secure DFU OTA for nRF52832 solution modules: Guide to create hex/zip file for implementation – Part 1(Bootloader & Application)

Below are the guidelines to implement Secure DFU OTA by using Raytac’s nRF52832 modules, SDK16.0.0.
It consists of 2 parts:

Part 1: Bootloader & Application


Part 2: Combining and merging built files (Article link)

In this article, we will be focusing on Part 1: Bootloader & Application.


Path: ..\nRF5_SDK_16.0.0_98a08e2\examples\dfu\secure_bootloader\pca10040_s132_ble\arm5_no_packs
Specifically for nRF52832, programmers need to embed ECC(Elliptic Curve Cryptography) into the bootloader.


Step 1. ’micro_ecc_lib_nrf52.lib’ library can be found in the path below, but we need to boot it up first.


Step 2. Unzip ’micro-ecc-master.zip’ to the below path(create a new “micro-ecc” file first).


Step 3. Run ’gcc-arm-none-eabi-7-2018-q2-update-win32.exe’.


Step 4. Make sure the Environment variables in Win10 are set as below. (Follow the steps 1 to 6)


Step 5. Open DOS → run the “make” command under armgcc path → generate’micro_ecc_lib_nrf52.lib’


Step 6. Add ’micro_ecc_lib_nrf52.lib’ into folder: nRF_micro-ecc


Step 7. An error may occur while building bootloader without a public key:
(Shown in red frames in below screenshot)


Step 8. How to generate the public key file in Bootloader?
A. Visit DOS at path: ..\Python27\Scripts
B. Then execute:

nrfutil keys generate private.pem
nrfutil keys display --key pk --format code private.pem --out_file public_key.c


Step 9. Copy the pk[64] code from (public_key.c) into (dfu_public_key.c)
(Shown in red frames in below screenshot)

※Note: Make sure to save the 3 generated files:
private.pem
public_key.c
dfu_public_key.c


Step 10. Generate the bootloader file: nrf52832_xxaa_s132.hex after re-compiling the code files.


Application


Path:
..\nRF5_SDK_16.0.0_98a08e2\examples\ble_peripheral\ble_app_uart\pca10040\s132\arm5_no_packs
Before building Application code , some amendments need to be made regarding DFU-related settings and code inside Application:


Step 1. Add code in definition in C/C++ :
BL_SETTINGS_ACCESS_ONLY NRF_DFU_SVCI_ENABLED NRF_DFU_TRANSPORT_BLE=1
(Total 3 steps definitions need to be set up)


Step 2. Add the 3 paths shown below in C/C++ to make DFU work.


Step 3. Add the .c files inside red frame in (Screenshots 1 & 2)
and add the 2 groups of (nRF_DFU & nRF_SVC)(Screenshot 4) under Project(Screenshot 3)


Step 4. Add code into main.c file in Application (..\examples\ble_peripheral\ble_app_uart\main.c)
(Please refer to: main.c file at: ..\examples\ble_peripheral\ ble_app_buttonless_dfu)


Step 5.
The code of file: sdk_config.h (..\examples\ble_peripheral\ble_app_uart\pca10040\s132\config\sdk_config.h)

inside Application needs to be modified.


Step 6. Adjust the IRAM1 value in Target after implementing DFU service:
Make sure the IRAM1 Value of *p_app_ram_start is modified from default: 0x20002AD8 0xD528 to
0x20002AE8 0xD518, as shown in the red frame in the bottom right corner.
In this case, the program should run/advertise successfully.


Step 7. Create a file of: nrf52832_xxaa.hex after building application code files.


Step 8. Create a bootloader setting file of nrf52832_bootloader_secure_settings.hex via DOS.
nrfutil settings generate –family NRF52 –application nrf52832_xxaa.hex –application-version 3 —
bootloader-version 2 –bl-settings-version 1 nrf52832_bootloader_secure_settings.hex –no-backup

※Stay tuned for Part 2: Combining and merging built files in the next article, scheduled release in next week(04-Sep-2024).


Technical guidelines provided by R&D Manager: Mr. MW Lee
Edited by Sales Manager: Ms. Mandy Chao


Raytac Corporation 勁達國際電子股份有限公司 
Raytac Corporation: A Bluetooth, Wi-Fi, and LoRa Module Maker based on
Nordic nRF54; nRF53: nRF52; nRF51; nRF7002
Semtech Specification: SX1262

Bluetooth Specification: BT5.4 ; BT5.3; BT5.2.
Wi-Fi Specification: Wi-Fi 6
LoRa Specification: LoRaWAN

All products are FCC/IC/CE/Telec/KC/RCM/SRRC/NCC Pre-Certified.
http://www.raytac.com
email: sales@raytac.com
Tel: +886-2-3234-0208

Transition tips for program from MDBT50Q-RX (USB-A) to MDBT50Q-CX (USB-C)  with current NRF52840 project

Intro:

This is a guidance provided for those who is going to transit (or replicate) their project from Raytac MDBT50Q-RX (USB-A Dongle) to MDBT50Q-CX(USB-C Dongle).  In addition to the hardware spec change (Compact Size , LED, Button, Pin definition change) , the key firmware configuration should be made with changes to fit new USB-C Dongle MDBT50Q-CX.


RX-1                    CX-1

    MDBT50Q-RX                           MDBT50Q-CX


 Table of Contents:

1. Comparison chart: MDBT50Q-RX(USB-A) & MDBT50Q-CX(USB-C)

2. Firmware configuration

3. Create a merged hex file (2 in 1 or 4 in 1)

4. Firmware flashing process


1. Comparison chart: MDBT50Q-RX & MDBT50Q-CX

Comparison chart


2. Firmware configuration : MDBT50Q-RX → MDBT50Q-CX

Edit your current MDBT50Q-RX firmware with configuration change to align the PIN change to accommodate the hardware change.

Option 1. Using nRF5 SDK:

Make the definition set up of LED, BUTTON pin in the highlighted 4 sections.

Firmware configuration-nRF5


Option 2. Using NCS V2.6.X:

Use the board name: nrf52840dongle_nrf52840 and add the overlay file:

nrf52840dongle_nrf52840.overlay to the program (Devicetree Overlays),

then configure the below code definition into the overlay file:

/ {
   leds {
             compatible = “gpio-leds";
             led0_green: led_0 {
                      gpios = <&gpio0 6 GPIO_ACTIVE_LOW>;
                      label = “Green LED 0″;
             };
             led1_red: led_1 {
                     gpios = <&gpio0 8 GPIO_ACTIVE_LOW>;
                     label = “Red LED 1″;
             };
};

  buttons {
  compatible = “gpio-keys";
  button0: button_0 {
                  gpios = <&gpio1 6(GPIO_PULL_UP | GPIO_ACTIVE_LOW)>;
                  label = “Push button switch 0″;
                                   };
};
};

Firmware configuration-NCS


3. Create a merged hex file (2-in-1 or 4-in-1 hex file)


3A. Bootloader public key product

nrfutil keys generate public_key.pem → for zipping new firmware

nrfutil keys display –key pk –format code public_key.pem –out_file public_key.c

→ include public key to compile bootloader hex file

3A-1

3A-2


3B. Examples Demo

nRF5 SDK: nRF5_SDK_17.1.0_ddde560\examples\ble_peripheral\ble_app_uart\pca10056\s140

NCS V2.6.X: ncs\v2.6.0\nrf\samples\bluetooth\peripheral_uart


3C. How to generate bootloader setting file (if you need bootloader):

nrfutil.exe settings generate –family NRF52840 –application nrf52840_xxaa.hex –application-version 255 –bootloader-version 2 –bl-settings-version 1 bootloader_settings.hex


3D. Merge and create a 2-in-1 or 4-in-1 hex file

a). Merge 2-in-1 (no Bootloader file required):

mergehex.exe -m s140_nrf52_7.2.0_softdevice.hex nrf52840_xxaa.hex -o merge.hex

3D-a


b). Merge 4-in-1 (with Bootloader file & Bootloader settings file required):

mergehex.exe -m bootloader.hex bootloader_settings.hex  s140_nrf52_7.2.0_softdevice.hex nrf52840_xxaa.hex -o merge.hex

3D-b


4. Firmware flashing process

MDBT50Q-RX(USB-A):Manual wiring is required to have the firmware uploaded.

Please refer to the article: Firmware Coding & DFU onto MDBT50Q-RX

MDBT50Q-CX(USB-C):Built-in open bootloader included for simple DFU process..

Please refer to the article: User Manual of MDBT50Q-CX (nRF52840/nRF52833-based USB-C Dongle)


Edited by Sales Manager:
 Ms. Jocelyn Tsai
Technical guidance provided by Firmware Deputy Manager: Mr. Stanley Huang

Raytac Corporation 勁達國際電子股份有限公司
Bluetooth & WiFi & LoRa module maker based on Nordic nRF54, nRF53, nRF52, nRF7002 solution
BT5.4 &BT5.3 & BT5.2 & BT5.1 Qualified, FCC/IC/CE/Telec/KC/RCM/SRRC/NCC/WPC Pre-Certified.
Bluetooth Solution: nRF54, nRF5340, nRF52840, nRF52833, nRF52832, nRF52820, nRF52811, nRF52810, nRF52805, nRF51822
WiFi Solution: nRF7002
http://www.raytac.com
email: sales@raytac.com
Tel: +886-2-3234-0208

User Manual of MDBT50Q-CX (nRF52840/nRF52833-based USB-C Dongle)

MDBT50Q-CX is an advanced version of Raytac’s MDBT50Q-RX(USB-A Dongle).

MDBT50Q-CX has a more compact size, equips an up-to-date Type C USB Connector, and it has a built-in open bootloader for simple DFU process.

If you’ve been developing projects using MDBT50Q-RX in the past, you can find out in this manual how MDBT50Q-CX makes firmware compiling and loading much easier than before.

If you want to load firmware into MDBT50Q-CX, no wiring is needed. 

Simply plug the dongle into your device and USB DFU will be available.

MDBT50Q-CX (USB-C Dongle, nRF52840/nRF52833 solution): Product link

Size: 15.10 x32.85mm (0.59×1.29inches)


Table of Contents

A. Hardware intro

B. Software development environment setup

C. Firmware Implementation with NCS (nRF Connect SDK) or NRF5 SDK

D. Execute DFU (Device Firmware Update)


A. Hardware Intro

 <Pin Allocation>

2

< Schematic> (Click on the image to redirect to product page for Higher resolution photo)

Schematic Spec_MDBT50Q-CX_-240806


B.  Software development environment setup

Option 1. Compile in NCS(nRF Connect SDK)

(1) Install nRF Connect for Desktop:

B1

(2) Install Toolchain Manager and Programmer

B2

(3) Install nRF Connect SDK (NCS) → V2.6.0 is recommended.

B3

Option2. Compile in nRF5 SDK

(1) Download open source nRF5 SDK (Recommend: download the latest version:  17.1.0)

B4

(2) Install Segger Embedded Studio v5.42a (Recommended version)

https://www.segger.com/downloads/embedded-studio/

B5

※Welcome to contact Raytac sales team for v5.42a file of Segger Embedded Studio.


C. Implement firmware in NCS (nRF Connect SDK) or NRF5 SDK

We will use the two example codes below for this demo:

C1. NCS (nRF Connect SDK):

Example code path: \v2.6.0\nrf\samples\bluetooth\peripheral_uart

C2. nRF5 SDK:

Example code path: \nRF5_SDK_17.1.0_ddde560\examples\peripheral\usbd_ble_uart


C1. NCS (nRF Connect SDK): (Using nRF Connect SDK V2.6.0)

Step C1-1. Add build configuration to Board name: nrf52840dongle_nrf52840

C1

Step C1-2. Disable DCDC & DCDCHV by adding the below code into  prj.conf  file

CONFIG_BOARD_ENABLE_DCDC=n

CONFIG_BOARD_ENABLE_DCDC_HV=n

C2

Step C1-3. Fix the VDD power to 3.0V or 3.3V in board.c  file

The default power is 3.0V if you use board name: nrf52840dongle_nrf52840.

In this case, you don’t need to alter the power.

C3

Step C1-4. Click the rebuild icon to reconfigure the program.

C4

Step C1-5. The program will be saved automatically in the path below:

C:\ncs\v2.6.0\nrf\samples\bluetooth\peripheral_uart\build\zephyr\zephyr.hex


C2. nRF5 SDK:

Step C2-1. Open the program under:

\nRF5_SDK_17.1.0_ddde560\examples\peripheral\usbd_ble_uart\pca10056\s140\ses\ usbd_ble_uart_pca10056_s140.emProject

Step C2-2.  Fix the VDD power supply to 3.0V or 3.3V.

C2-1

Step C2-3. Start editing the project by opening the solution in Editor.

C2-2

Change the board name from PCA10056(nRF52840-DK) to PCA10059(nRF52840 dongle).

Save and re-compile the program after the amendment.

C2-3

Click the program file name and save the modified project.

C2-4

Press “Yes” to re-load the new set up value into configuration.

C2-5

The default code in sdk_config.h is: NRF_LOG_BACKEND_UART_ENABLED 1 (in red frame);

Please change 1 to 0 to make the LED light work.

Stanley修改內容_20240806

Press “Rebuild Solution” to make sure all the parameters you’ve modified are reconfigured.

C2-6

Step C2-4. The program will be saved automatically under the path below:

V:\nRF5_SDK_17.1.0_ddde560\examples\ble_peripheral\ble_app_uart\pca10056\s140\ses\Output\Release\Exe\ble_app_uart_pca10056_s140.hex


D. Execute DFU (Device Firmware Update)

Reminder: 

No extra bootloader can be programmed into MDBT50Q-CX until you manually wire the pins on the PCB and erase the built-in bootloader.  You can simply operate DFU using MDBT50Q-CX’s bootloader.

Step D1. How to enable DFU?

(1) Press the button on MDBT50Q-CX

(2) Plug MDBT50Q-CX into your device while pressing the button

(3) Press and wait for approx.1 second until the LED light turns on. → DFU is activated.

(4) Release the button

※When Bootloader mode is enabled, the LED light on MDBT50Q-CX will twinkle continuously. 

D1

Step D2. Open the built-in DFU Bootloader

nRF Connect Desktop →  Programmer  → SELECT DEVICE  → Open DFU Bootloader

D2

You have successfully entered bootloader mode after you see the screen as below.

D3

Step D3. Add ready firmware file into the Programmer

(The program completed and saved during Step C1-5(NCS) or Step C2-4(nRF5 SDK))

※If you’re using nRF5 SDK, you need to add the soft device file into your program for loading firmware.

※Soft device path:

nRF5_SDK_17.1.0_ddde560\components\softdevice\s140\hex\s140_nrf52_7.2.0_softdevice.hex

D4

Step D4. Load the firmware and write it into the MDBT50Q-CX

D5

Step D5. Process FW DFU

D6

Step D6.  DFU Completed. The appointed firmware is successfully loaded into MDBT50Q-CX.

D7

※Any failure during the DFU process will leave you under bootloader mode.

Last-failure

If this happens, simply restart the firmware writing process from Step D4 to reload your firmware into MDBT50Q-CX.


Edited by Sales Manager: Ms. Jocelyn Tsai
Technical guidance provided by Firmware Deputy Manager: Mr. Stanley Huang

Raytac Corporation 勁達國際電子股份有限公司
Bluetooth & WiFi & LoRa module maker based on Nordic nRF54, nRF53, nRF52, nRF7002 solution
BT5.4 &BT5.3 & BT5.2 & BT5.1 Qualified, FCC/IC/CE/Telec/KC/RCM/SRRC/NCC/WPC Pre-Certified.
Bluetooth Solution: nRF54, nRF5340, nRF52840, nRF52833, nRF52832, nRF52820, nRF52811, nRF52810, nRF52805, nRF51822
WiFi Solution: nRF7002
http://www.raytac.com
email: sales@raytac.com
Tel: +886-2-3234-0208


Secure DFU OTA for nRF52840 solution modules: Guide to create hex/zip file for implementation – #3(Combining/merging built files)

Following up – Part A: Bootloader (Click for article link) and Part B: Application (Click for article link)

We will be focusing on:

in this article.

IC: nRF52840
DK: PCA10056 (for nRF52840)
SDK: 17.1.0
Softdevice: s140_nrf52_7.2.0_softdevice.hex
IDE: Keil C
PC: Win 10


Step 1. Execute the combine batch file in bootloader (nrf52840_bootloader_setting_merge.bat) and generate file of nrf52840_bootloader_secure_combin_settings.hex :

@echo off
title = [ J-Link Tool ] %CD%
set nrfDir=C:\Program Files (x86)\Nordic Semiconductor\nrf5x\bin
set BS= nrf52840_bootloader_secure_settings.hex
set BL= nrf52840_xxaa_s140.hex
set BSBLCombind= nrf52840_bootloader_secure_combin_settings.hex
set path=%nrfDir%;%path%
pause
echo ———–merge image file——————-
mergehex.exe -m %BS% %BL% -o %BSBLCombind%
pause


Step 2. Create a Final.hex file by 3-in-1 batch file(nrf52840_3in1_merge.bat)
※Note : This hex file is created for the production line to pre-load firmware into modules prior to shipment.

@echo off
title = [ J-Link Tool ] %CD%
set nrfDir=C:\Users\user\Desktop\Nordic BLE\nRF5_merge tools\nRF52 bin
set SD= s140_nrf52_7.2.0_softdevice.hex
set BLT= nrf52840_bootloader_secure_combin_settings.hex
set APP= nrf52840_xxaa.hex
set SD_BLT=SD_BLT.hex
set Finalfile=Final.hex
set path=%nrfDir%;%path%
pause
echo ———–merge image file——————-
mergehex.exe -m %SD% %BLT% -o %SD_BLT%
pause
mergehex.exe -m %SD_BLT% %APP% -o %Finalfile%
pause


Step 3. Create a DFU(OTA).zip file of nrf52840_xxaa.zip
※Note : This zip file is created for end device DFU(OTA) implementation.

nrfutil pkg generate –hw-version 52 –sd-req 0x100 –application-version 0xFF –application
nrf52840_xxaa.hex –key-file private.pem nrf52840_xxaa.zip

The DFU OTA zip file will be derived.

※Note :
The “0x100" appeared in the above DOS code(in red font) is the FWID(Firmware ID) for s140_nrf52_7.2.0_softdevice.hex;
FWID can be found from the soft device documents on the Nordic website.


Step 4: Run DFU OTA (On mobile in this example)


4A. Install the nRF Connect APP on mobile, with DFU OTA file: nrf52840_xxaa.zip. (Download link)


4B. Send nrf52840_xxaa.zip via email to mobile device after combination is done on PC, then download it.


4C. Open nRF Connect APP and run connection;


4D. Execute DFU and select “Distribution packet(ZIP)", thus starting the DFU OTA process.


4E. Start DFU OTA → exit the APP after DFU OTA is completed → restart the mobile device.


Secure DFU OTA for nRF52840 solution modules: Guide to create hex/zip file for implementation
Detailed links of articles:
Part A: Bootloader (Click for article link)
Part B: Application
(Click for article link)
Part C: Combining and merging built files
(Click for article link)


Technical guidelines provided by R&D Manager: Mr. MW Lee
Edited by Sales Manager: Mr. Tony Yin

Raytac Corporation 勁達國際電子股份有限公司 
Bluetooth & WiFi module maker based on Nordic nRF54, nRF53, nRF52, nRF7002 solution
BT5.4 &BT5.3 & BT5.2 & BT5.1 Qualified, FCC/IC/CE/Telec/KC/RCM/SRRC/NCC Pre-Certified.
Bluetooth Solution: nRF54, nRF5340, nRF52840, nRF52833, nRF52832, nRF52820, nRF52811, nRF52810, nRF52805, nRF51822
WiFi Solution: nRF7002
http://www.raytac.com
email: service@raytac.com
Tel: +886-2-3234-0208

Secure DFU OTA for nRF52840 solution modules: Guide to create hex/zip file for implementation – #2(Application)

Following up-Part A: Bootloader (Click for article link)

We will be focusing on:

in this article.

IC: nRF52840
DK: PCA10056 (for nRF52840)
SDK: 17.1.0
Softdevice: s140_nrf52_7.2.0_softdevice.hex
IDE: Keil C
PC: Win 10


Path: nRF5_SDK_17.1.0_ddde560\examples\ble_peripheral\ble_app_uart\pca10056\s140\arm5_no_packs

Before building Application code , some amendments need to be made regarding DFU-related settings and code inside Application:

Step 1.


1A. Add code in definition in C/C++ :
BL_SETTINGS_ACCESS_ONLY NRF_DFU_SVCI_ENABLED NRF_DFU_TRANSPORT_BLE=1
(Total 3 steps definitions need to be set up)


1B. Add “include path” in C/C++


1C. Add the .c files inside red frame in (Screenshots 1 & 2)
and the 2 groups of (nRF_DFU & nRF_SVC)(Screenshot 3) under Project(Screenshot 4)


1D. Add code into main.c file in Application (..\examples\ble_peripheral\ble_app_uart\main.c)
(Please refer to: main.c file at: ..\examples\ble_peripheral\ ble_app_buttonless_dfu)


1E. The code of file: sdk_config.h (..\examples\ble_peripheral\ble_app_uart\pca10056\s140\config\
sdk_config.h) inside Application needs to be modified.


1F. Adjust the IRAM1 value in Target after implementing DFU service:
Check on the IRAM1 Value of *p_app_ram_start to be modified from default: 0x20002AE8 0x3D518 to 0x20002AF8 0x3D508, as shown in the red frame in the bottom right corner.
In this case, the program should run successfully.


1G: Create a file of: nrf52840_xxaa.hex after building application code files.


Step 2. Create a bootloader setting file of nrf52840_bootloader_secure_settings.hex : (via DOS)

nrfutil settings generate –family NRF52840 –application nrf52840_xxaa.hex –application-version 3 — bootloader-version 2 –bl-settings-version 1 nrf52840_bootloader_secure_settings.hex –no-backup


※Stay tuned for #3 – Part C: Combining and merging built files in the next article,

scheduled release in next week(05/06/2024).


Technical guidelines provided by R&D Manager: Mr. MW Lee
Edited by Sales Manager: Mr. Tony Yin

Raytac Corporation 勁達國際電子股份有限公司 
Bluetooth & WiFi module maker based on Nordic nRF54, nRF53, nRF52, nRF7002 solution
BT5.4 &BT5.3 & BT5.2 & BT5.1 Qualified, FCC/IC/CE/Telec/KC/RCM/SRRC/NCC Pre-Certified.
Bluetooth Solution: nRF54, nRF5340, nRF52840, nRF52833, nRF52832, nRF52820, nRF52811, nRF52810, nRF52805, nRF51822
WiFi Solution: nRF7002
http://www.raytac.com
email: service@raytac.com
Tel: +886-2-3234-0208