Preface:
Here provides an easy introduction of How to set up of nRF52840 & nRF52833 Module Demo board MDBT50Q-DB-40 (for nRF52840) & MDBT50Q-DB-33 (for nRF52833)

_1000X1000_190102")
Table of contents:
1.1 Hardware Set Up
1.2 Software Kits resources & preparations
1.3 Flash the ready firmware into Raytac’s module
1.4 DFU to MDBT50Q-DB-XX through USB interface
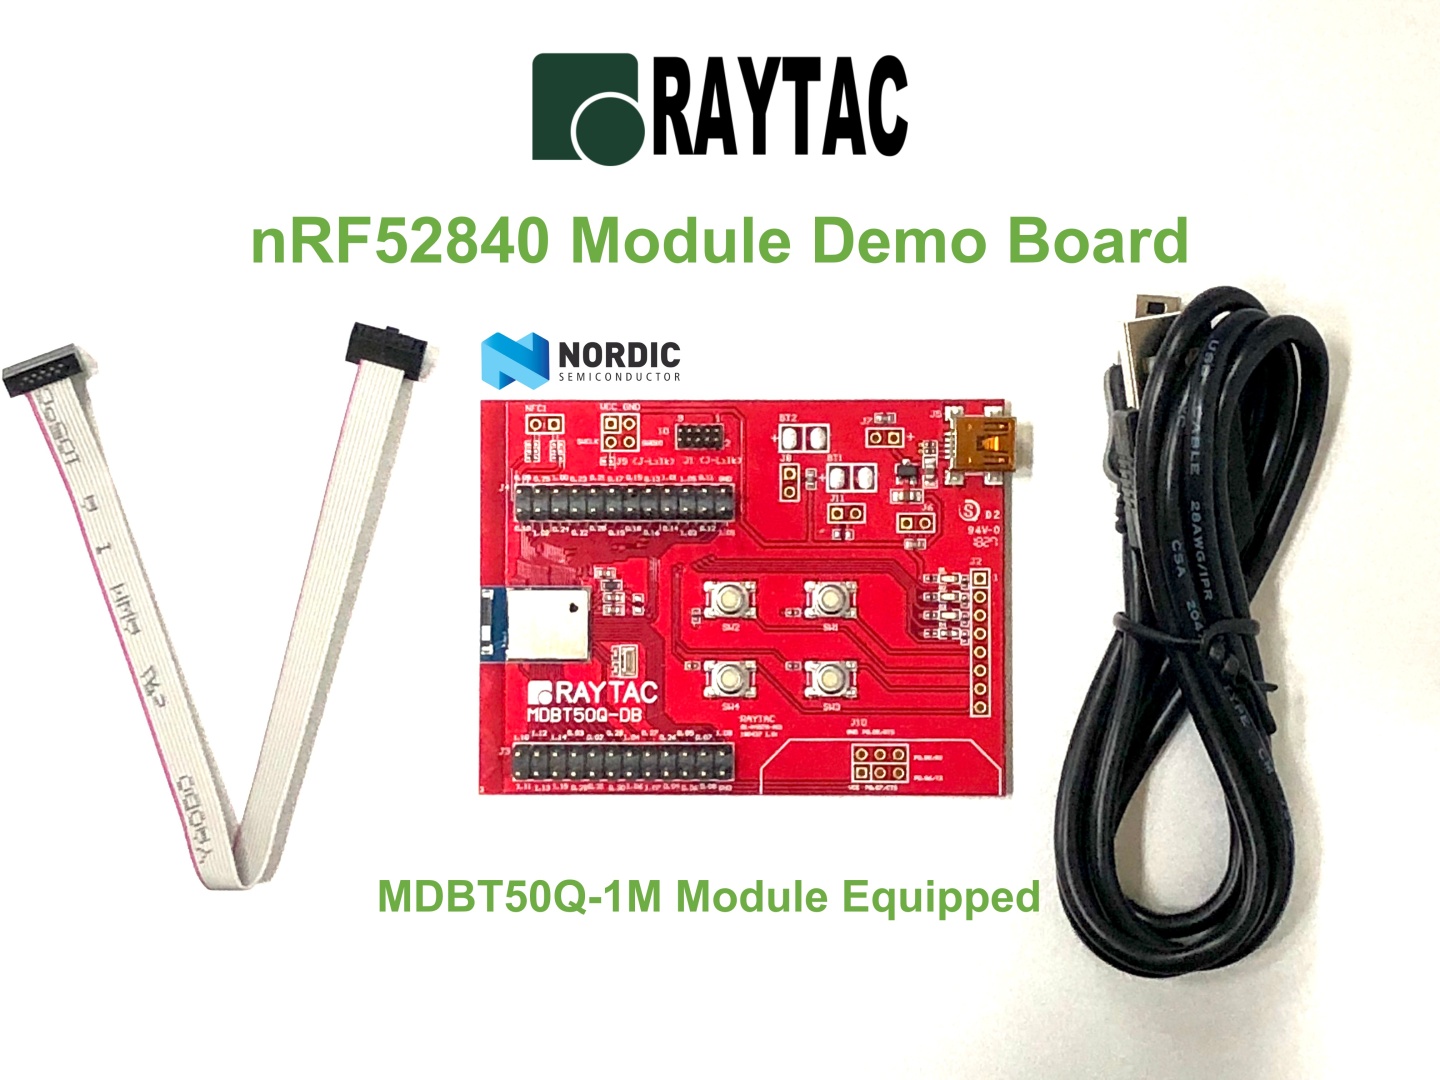
- 1 x MDBT50Q-DB-40/MDBT50Q-DB-33
- 1 x IDC Wire
- 1 x Data/Power Mini USB Wire(for data transferring)
Where to buy MDBT50Q-DB-XX?
MDBT50Q-DB-40 (nRF52840 Solution)
MDBT50Q-DB-33 (nRF52833 Solution)
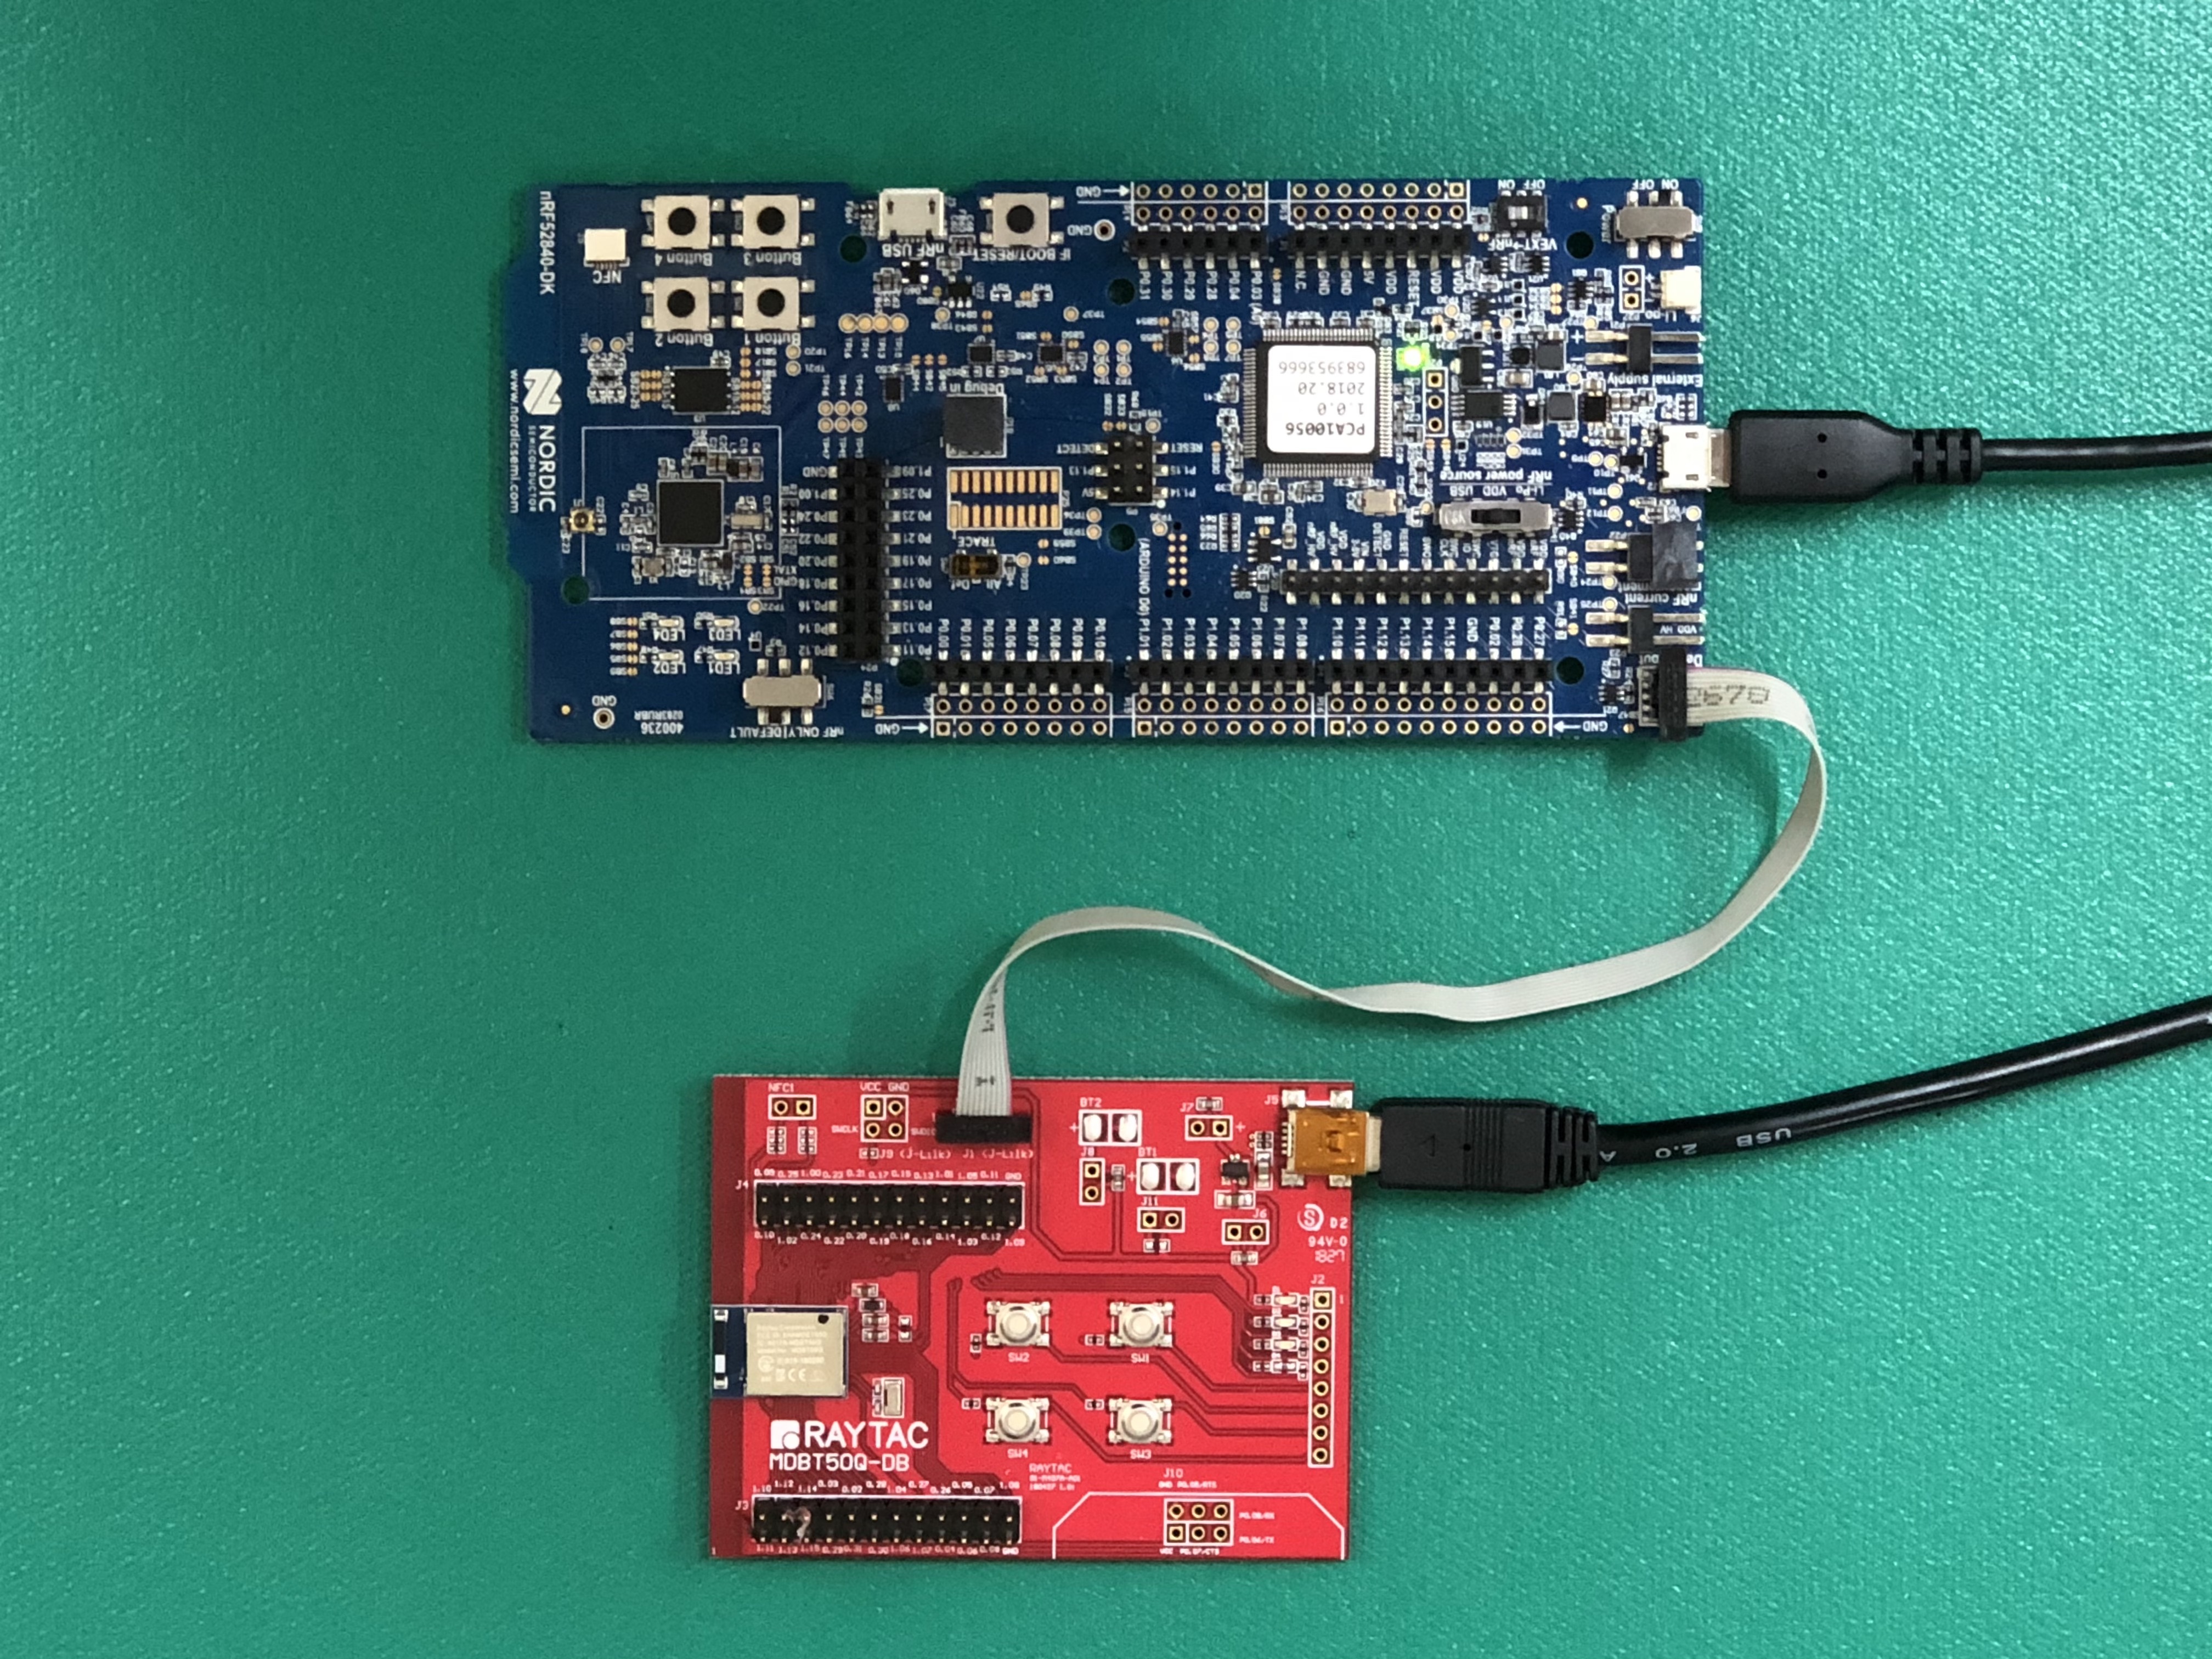
→ Connect Nordic NRF52-DK/NRF52840-DK Connect with MDBT50Q-DB-40 by IDC Wire
※Note: PCA10056 (NRF52840-DK) / PCA10040 (NRF52832-DK) / PCA10100(NRF52833-DK)
→ Power up MDBT50Q-DB-XX using Mini USB
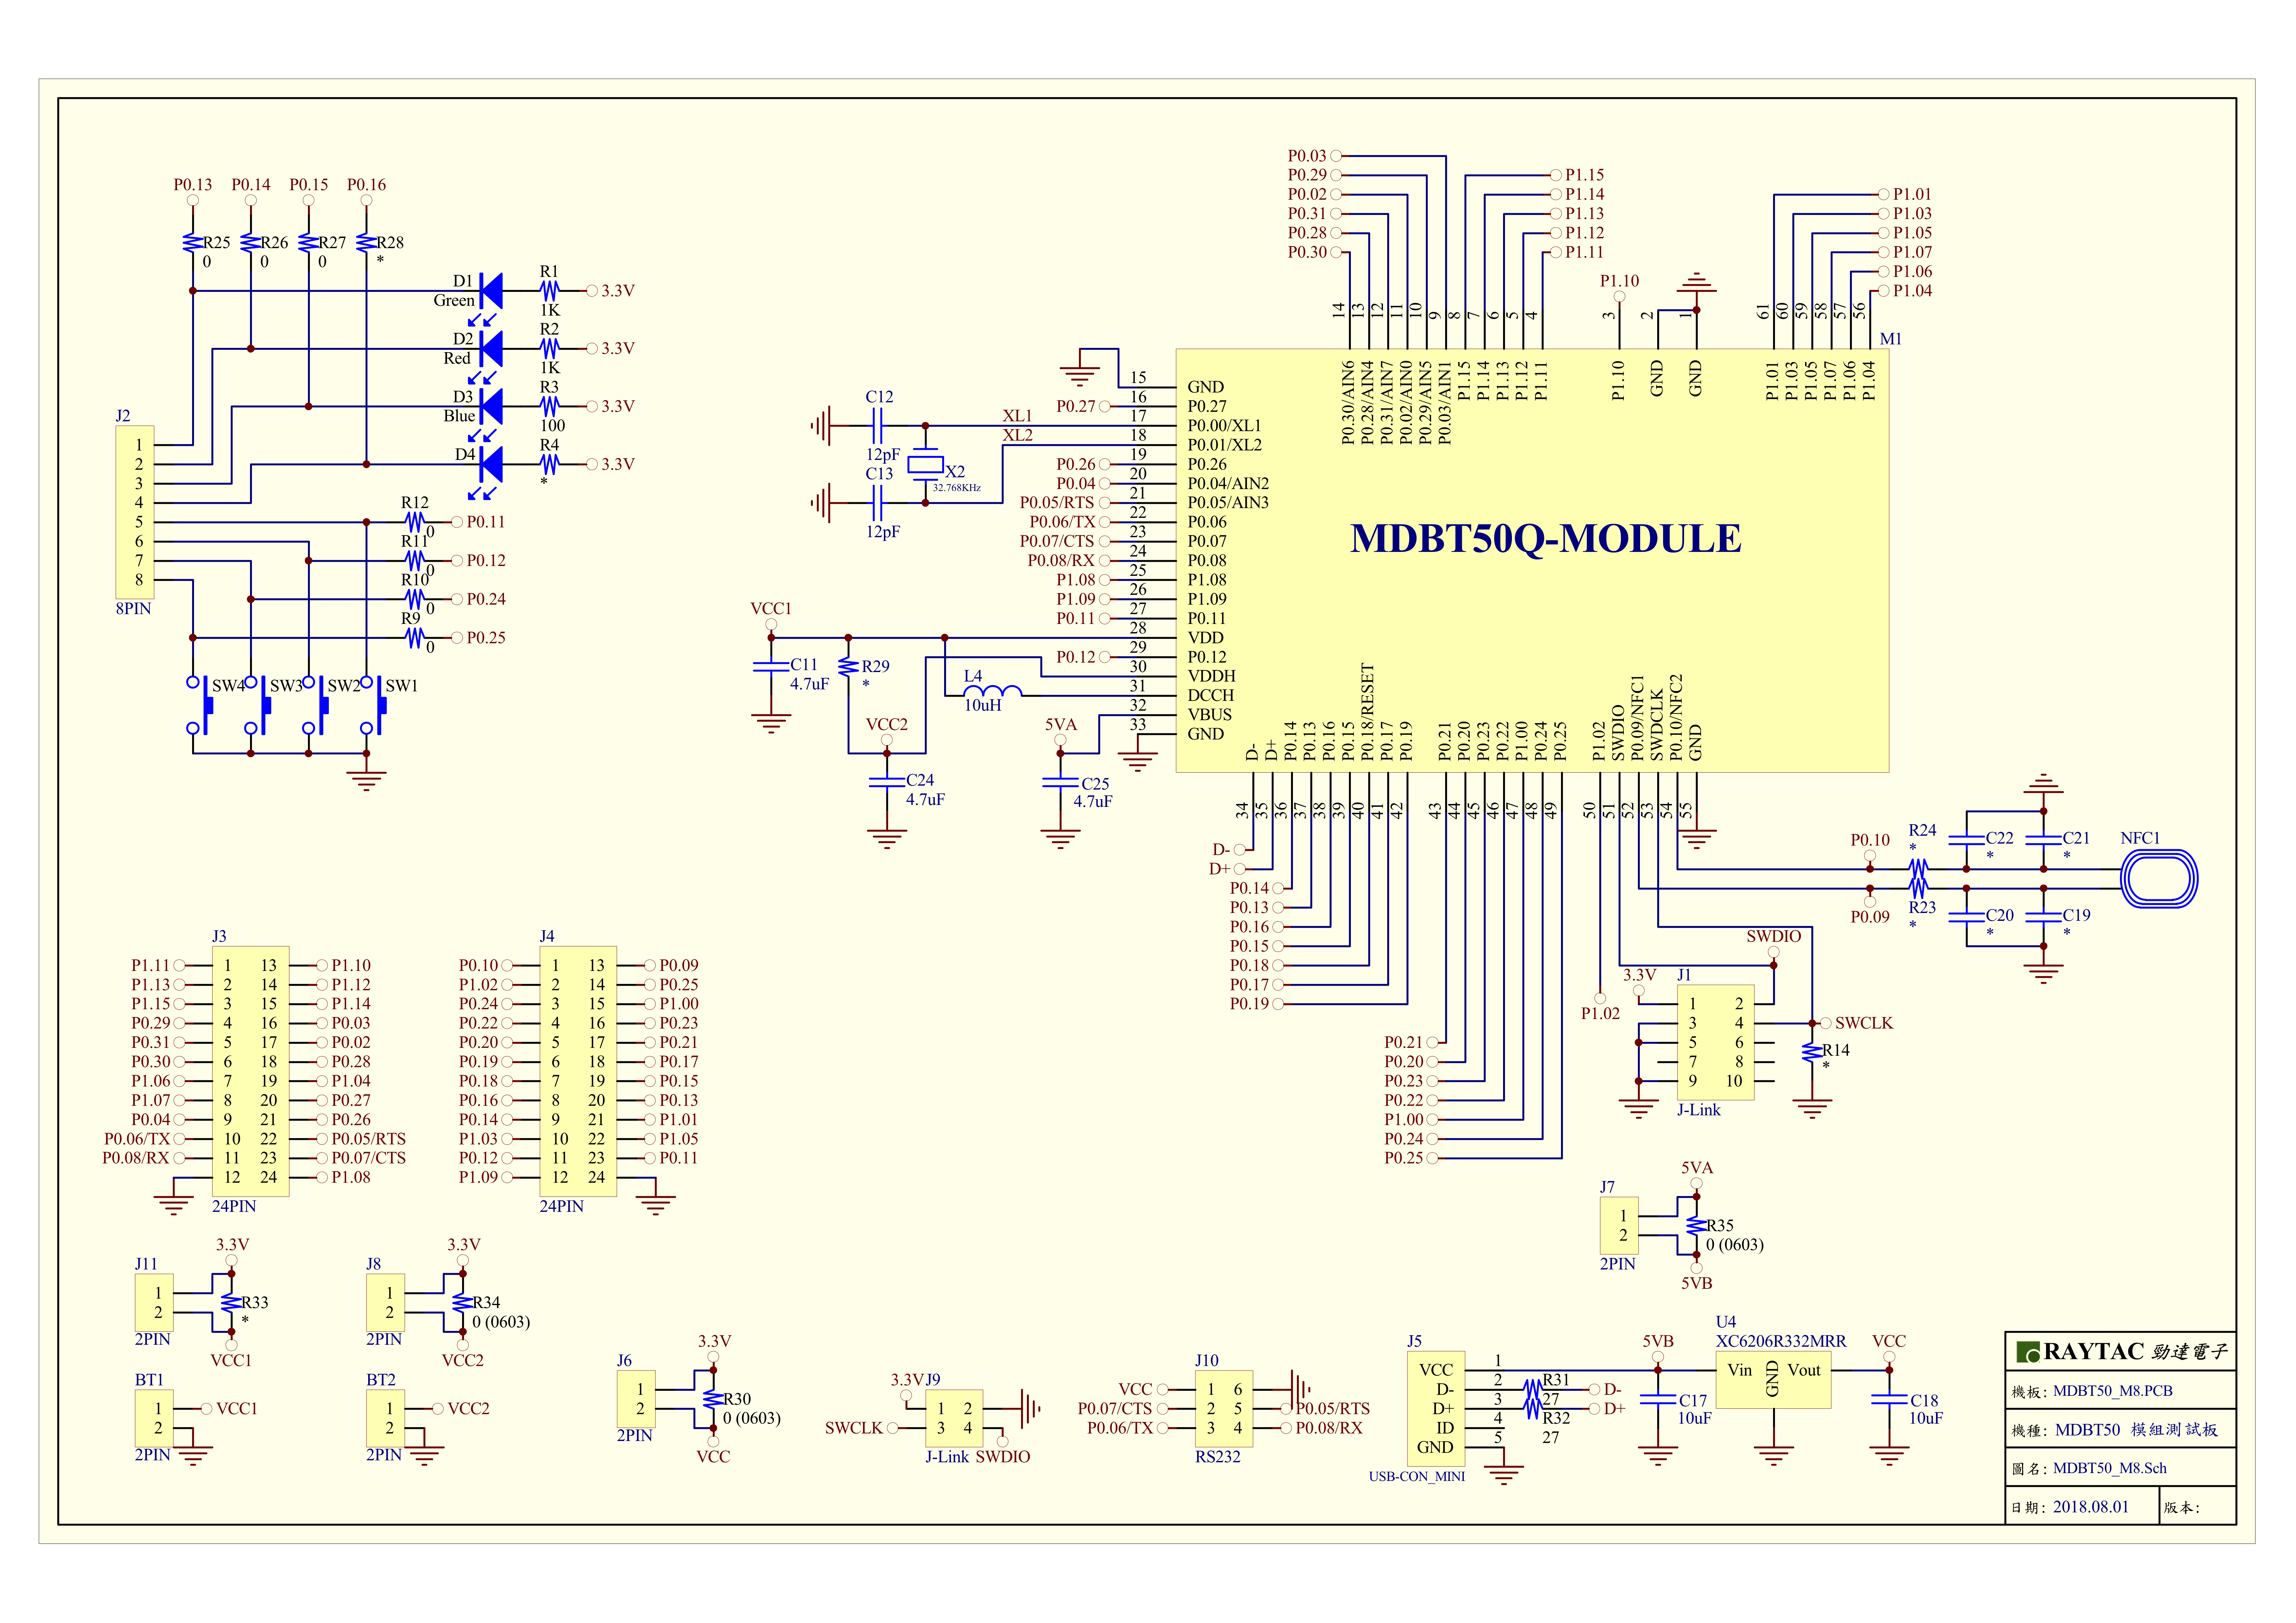
MDBT50Q-DB-40 Schematic:
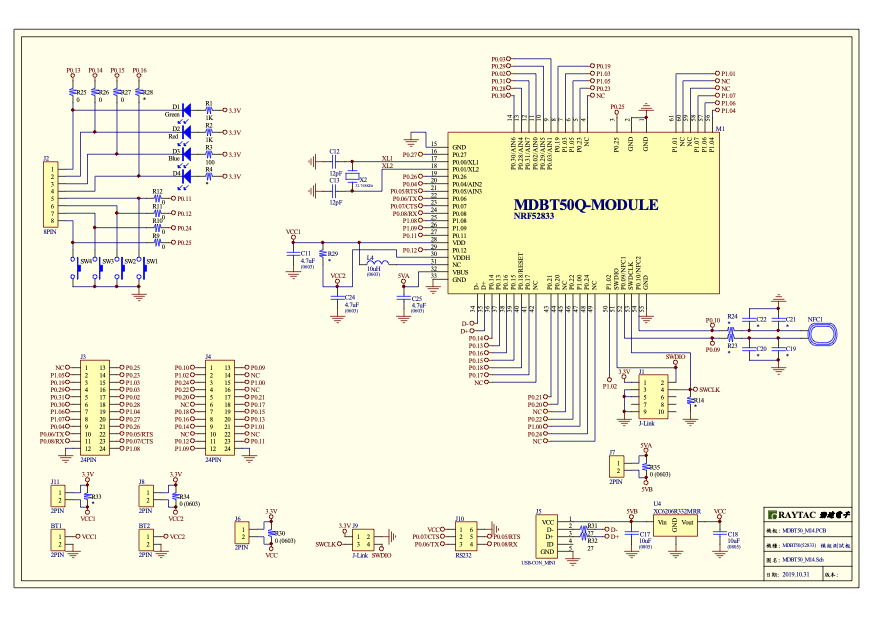
MDBT50Q-DB-33 Schematic:
1.2 Software kits resources & preparations
Resources:
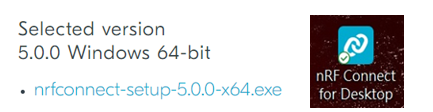
Download nRF Connect For Desktop (Please Click Me)
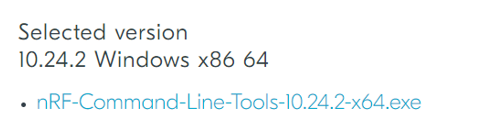
Download nRF Command Line Tools (Please Click Me)
Download NRF5 SDK (The latest V17.1.0) (Please Click Me)
Download Visal Studio Code(Please Click Me)
Preparations:
Option 1. NRF5 SDK (The latest version V17.1.0)
- 1.0_ddde560\components\softdevice\s140\hex\ s140_nrf52_7.2.0_softdevice.hex
- 1.0_ddde560\examples\ble_peripheral\ble_app_uart\pca10056\s140\arm5_no_packs\_build\ nrf52840_xxaa.hex
*Tips: If you go with nRF5 SDK option, please consider to add a bootloader hex file if you’re going to make DFU requests in the future.
Option 2. NCS (Recommended version V2.6.0)
2A. Find “Toolchain Manager” in app nRFConnect for Desktop
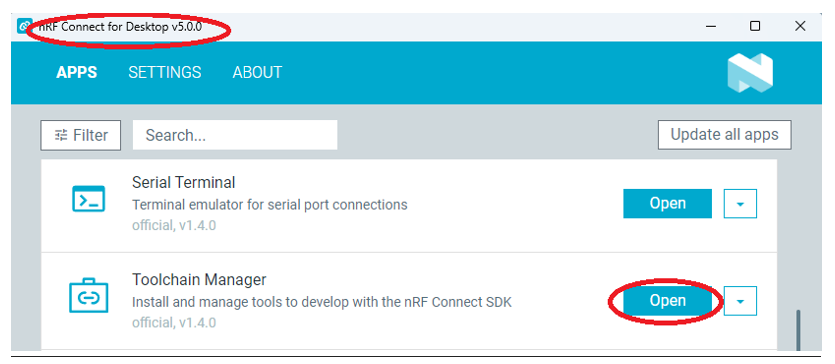
2B. Install nRFConnect SDK V2.6.0 to your working site.


1.3 Flash the ready firmware into Raytac’s module
Intro:
With the ready built code of zephyr.hex (Made through NCS) or nrf52840_xxaa.hex & s140_nrf52_7.2.0_softdevice.hex (Made through nRF5-SDK) file for application, we would like to move onto flashing code into the MDBT50Q BLE module(mounted on MDBT50Q-DB-XX demo board).
Step1.
Execute nRF Connect >> Programmer > > Open

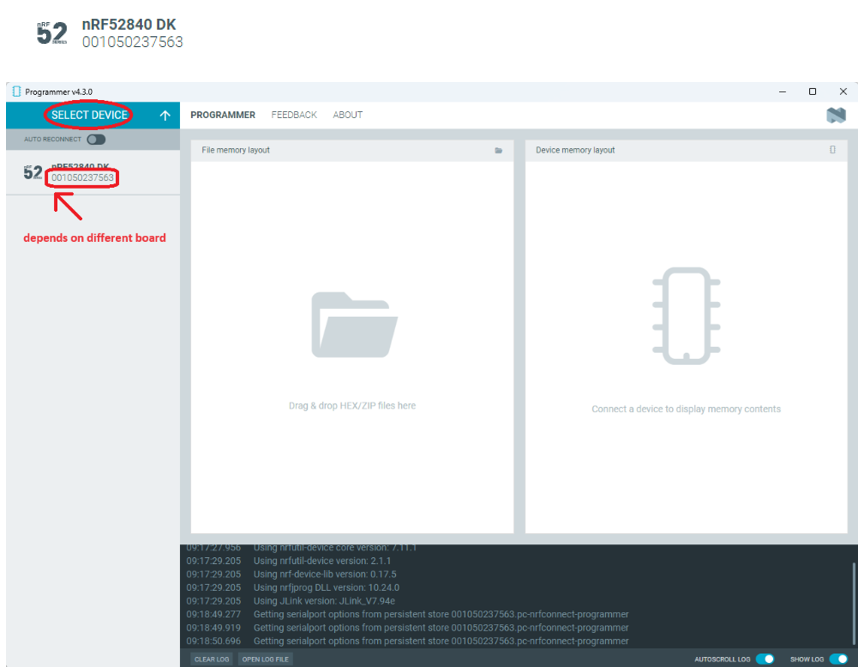
Step2.
Click “SELECT DEVICE” >> Find icon “nRF52840 DK” which is detected by the programmer app
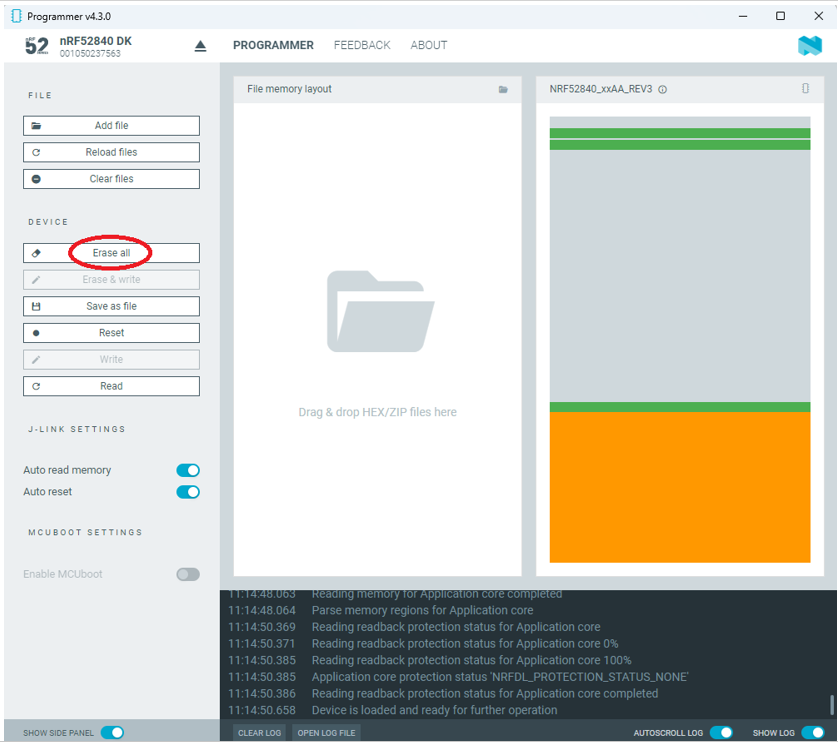
Step3.
Click “nRF52840 DK”>> “Erase All” to remove flash memory inside MDBT50Q BLE Module
Step4.
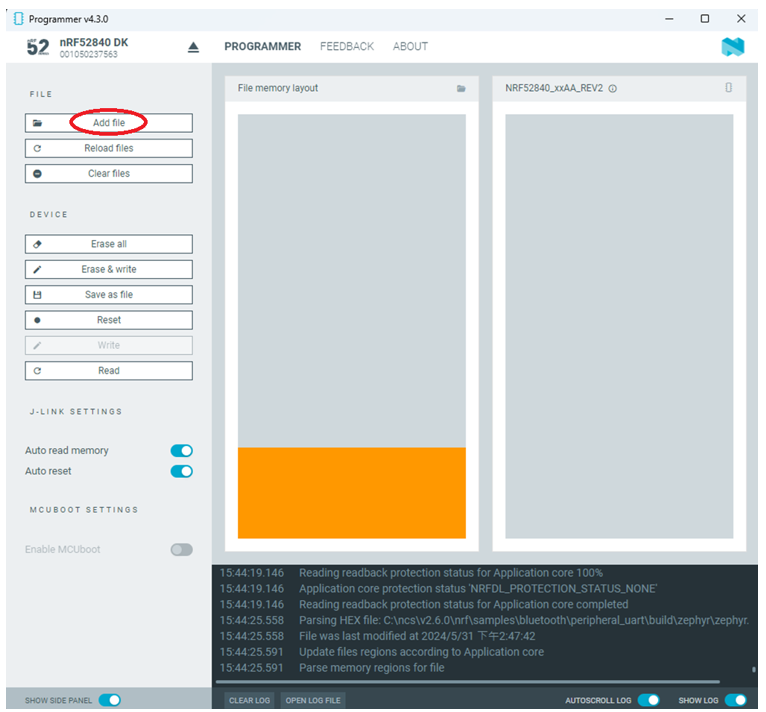
Click “Add File” to load application zephyr.hex into programmer
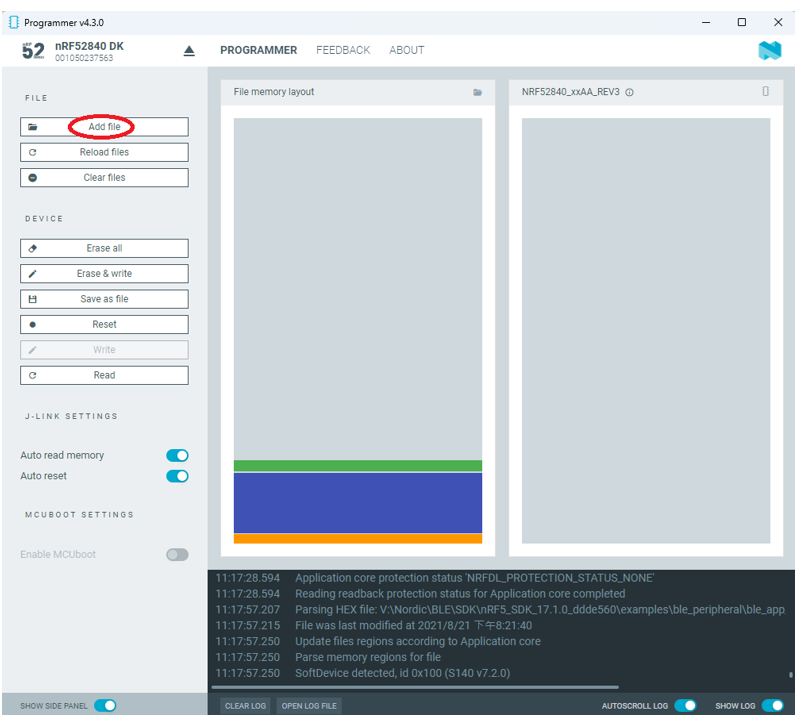
✓ If you’re using nRF Connect SDK for code compiling as above, Program the hex file to MDBT50Q BLE module on the MDBT50Q-DB Demo board:
C:\ncs\v2.6.0\nrf\samples\bluetooth\peripheral_uart\build\zephyr\zephyr.hex
✓ If you’re using NRF5 SDK for code compiling, you need to program the following two hex files into the MDBT50Q BLE module on the demo board:
nRF5_SDK_17.1.0_ddde560\components\softdevice\s140\hex\s140_nrf52_7.2.0_softdevice.hex
nRF5_SDK_17.1.0_ddde560\examples\ble_peripheral\ble_app_uart\pca10056\s140\arm5_no_packs\_build\ nrf52840_xxaa.hex
!! Important Tips to securing DFU:!!
✓ If it is confirmed to require DFU in this project, it is recommended to build a 4-in-1 bootloader. (The 4-in-1 bootloader should be created by your own after having the private key activated uniquely).
(1) bootloader.hex
(2) bootloader_setting_file.hex
(3) s140_nrf52_7.2.0_softdevice.hex
(4) nrf52840_xxaa.hex
1.4 DFU to MDBT50Q-DB-XX through USB interface
Intro : Before DFU implement , Please make sure the bootloader file has been installed in your MDBT50Q BLE module.
※Note: NRF52840 SoC supports USB interface to utilize Device Firmware Update (DFU).
How do I prepare the software??
- Download nrfutil.exe file from Nordic website .
- It is workable to do List, Program, Recover, Erase, and operations with nRFutil device command to Nordic device.
- Open DOS mode to install device command type: nrfutil install device

How do I setup the hardware??
- Press Switch 4 and hold
- Power up Demo Board
- Blue LED Lights on
- Demo Board successfully enters into USB DFU Mode

How do I prepare the firmware??
**USB DFU works only in DOS mode.
**USB DFU only works when USB Bootloader installed in current loaded firmware (inside BLE Module)
A single, merged 4-in-1 hex file is required, which includes:
Bootloader, Bootloader setting, Softdevice, and Application.
Firmware DFU requires a .zip file.
USB DFU Execution Steps:
Step 1. When Blue LED Lights on with MDBT50Q-DB (Ready to enter USB DFU Mode)
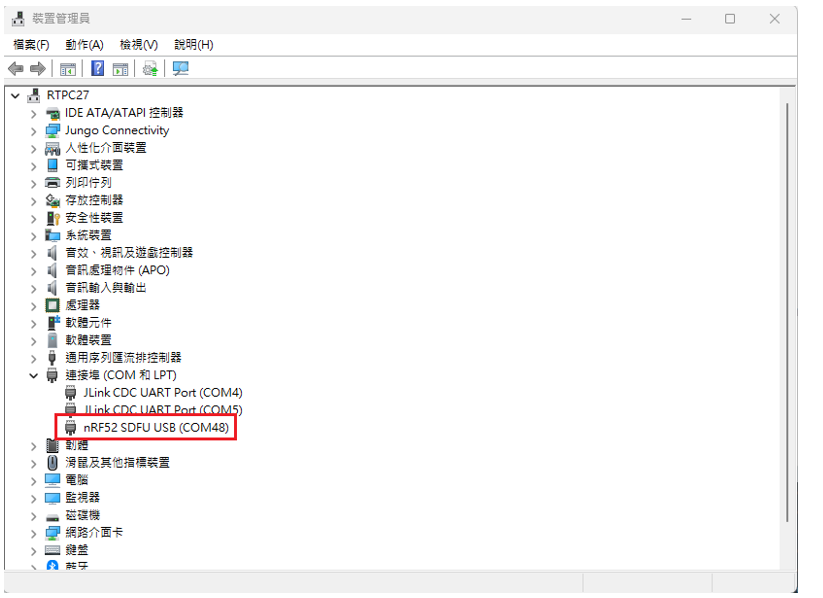
Step 2. Find out Com Port No. “nRF52 SDFU USB(COMxx)”
Step 3. Execute USB DFU
Option 1. Using device program command:
(1) List the devices with a DFU trigger interface by running:
nrfutil device list –traits nordicDfu

(2) Program new firmware to a device identified by its serial number by running:
nrfutil device program –firmware .zip nrf52840_xxaa.zip –serial-number XXXXXXXXXXXX

Option 2. Use the same way as nRF Util 6.1 or earlier version
(1) Run Command: nrfutil install nrf5sdk-tools
When nrf5sdk-tools is installed, nRF Util will behave in the same way as nRF Util 6.1 or earlier versions.

(2) Enter into DOS mode and execute command: nrfutil dfu usb-serial -pkg nrf52840_xxaa.zip -p COMxx
- nrf52840_xxaa.zip refers to the code to update
- xx refers to Com Port No.

(3) USB DFU completed.

!! Important Tips:
1. Bootloader Code can be found in:
\nRF5_SDK_17.1.0_ddde560\examples\dfu\secure_bootloader\pca10056_usb
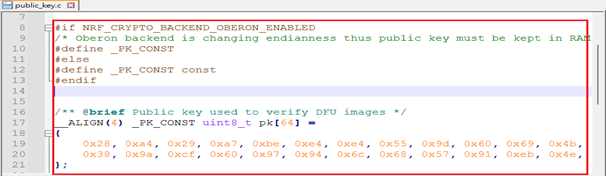
2. How to generate public key:
nrfutil keys generate public_key.pem – for zipping new firmware
nrfutil keys display –key pk –format code public_key.pem –out_file public_key.c
→ make sure to include public key when compiling the bootloader hex file

3. How to generate bootloader settings hex file:
nrfutil.exe settings generate –family NRF52840 –application nrf52840_xxaa.hex –application-version 255 –bootloader-version 2 –bl-settings-version 1 bootloader_settings.hex
4. How to merge the firmware:
mergehex.exe -m bootloader.hex bootloader_settings.hex s140_nrf52_7.2.0_softdevice.hex nrf52840_xxaa.hex -o merge.hex
5. How to zip the firmware:
nrfutil pkg generate –hw-version 52 –sd-req 0x100 –application-version 0xFF –appliction nrf52840_xxaa.hex –key-file public_key.pem nrf52840_xxaa.zip
Useful references:
Edited by Sales Manager: Ms. Jocelyn Tsai
Raytac Corporation 勁達國際電子股份有限公司
Bluetooth & Wi-Fi & LoRa module maker based on Nordic nRF54, nRF53, nRF52, nRF7002 solution
BT5.4 &BT5.3 & BT5.2 & BT5.1 Qualified, FCC/IC/CE/Telec/KC/RCM/SRRC/NCC Pre-Certified.
Bluetooth Solution: nRF54, nRF5340, nRF52840, nRF52833, nRF52832, nRF52820, nRF52811, nRF52810, nRF52805, nRF51822
WiFi Solution: nRF7002
http://www.raytac.com
email: service@raytac.com
Tel: +886-2-3234-0208

I have a MDBT5Q-DB board, but cannot get the DFU mode working. I plug in the USB cable on the board, press SW4 and then plug the cable in the USB port of my laptop. No leds are on.
讚Liked by 1 person
Hi , USB DFU mode only works when previous loaded firmware employs bootloader feature. Please make sure you have loaded your own code by hardware first. Afterward. you can DFU via USB based on DOS mode. If there is any more supports need, please feel free coming up to service@raytac.com.
讚讚
Can you please provide instructions on how do I load the firmware without using DFU mode? Do I need an additional board? Do you have a sample firmware that provide DFU? Does this also mean that any firmware I upload must have some DFU code for DFU to work?
讚讚
In this article, you can find we are using Nordic’s board acted as a J-Link. In other words, you can either just use J-Link straight away or Nordic’s board.
For hardware set up, you can find how to connect to each other from the picture in this article.
For the example firmware, you can also find it from “Firmware Set Up Resource" in this article.
讚讚
Hello,
Where can i find the PCB design for this Breakout board?
讚讚
Hi, you may find the information from Raytac’s website
MDBT50Q-DB-40 (nRF52840)
https://www.raytac.com/product/ins.php?index_id=81
MDBT50Q-DB-33 (nRF52833)
https://www.raytac.com/product/ins.php?index_id=97
Thank you!
讚讚
Hi, you may reach Raytac (service@raytac.com) for further support input.
讚讚
I am facing the problem that can not program a firmware to MDBT50Q-DB by nRF Connect programmer.
I have nRF52840 DK and MDBT50Q-DB. They are connected with nRF52840 DK by IDC wire.
and both nRF52840 DK and MDBT50Q-DB are connected with PC by USB cable like this article.
nRF52840 DK is detected the COM port as JLink CDC UART Port in device manager, but another one does not detected.
Does it have any setting on board to detect COM port such as dipswitch ?
讚讚
Hi~we suggest flashing your own firmware into MDBT50Q-DB via nRF52840 DK, acted as J-Link, with nRFgo software.
Before firmware flashing, the USB cable for MDBT50Q-DB is working as power wire only.
Warm reminding: MDBT50Q-DB modules comes with Raytac’s inspection firmware pre-loaded. Please erase it before flashing. Thank you.
讚讚
I could program to MDBT50Q-DB with nRFgo studio.
I have not noticed nRFgo studio occurd error.
It said “nrfjprog.dll is not correctly installed. Please run the nRF Tools installer to install the newest version."
So I updated the latest version of nRF command line tool for Win64, but it was wrong.
I installed for Win32 instead, then nRFgo studio detects MDBT50Q-DB.
https://www.nordicsemi.com/Software-and-tools/Development-Tools/nRF-Command-Line-Tools
Thank you.
讚讚